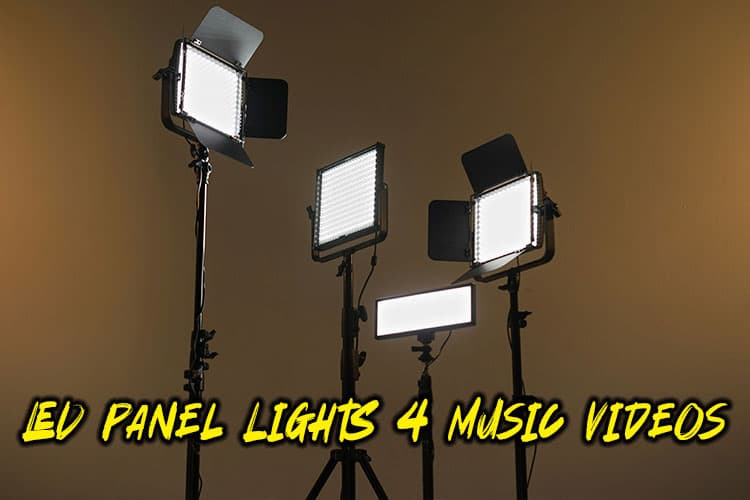
When it comes to creating captivating music videos, lighting is everything.
That’s why nailing your lighting game is crucial!
In this guide, we’ll dive into the world of LED panel light kits, perfect for elevating your music videos from amateur to professional.
Get ready to shine bright and make your visuals pop!
Understanding LED Panel Light Kits for Music Videos
Let me tell ya, when I first started messing around with LED panel light kits for my music video projects, I was totally lost.
I mean, I knew they were these flat, bright lights, but that was about it.
Now, after years of trial and error (and boy, were there some errors!), I’ve got a pretty good handle on what these bad boys can do.
So, what exactly are LED panel light kits?
Well, they’re basically these slim, lightweight panels packed with a bunch of tiny LED bulbs.
They’re super versatile and can pump out a ton of light without heating up like crazy.
Trust me, your talent will thank you for not cooking them under hot lights all day!
Benefits of LED Panel Lights
The benefits of using LED panels in music video production are huge.
First off, they’re energy efficient as heck.
I remember back in the day, we’d blow fuses left and right with all our old-school lights. Not anymore!
These LEDs sip power like it’s a fine wine.
Plus, they’re dimmable and often color-adjustable, which means you can fine-tune your lighting on the fly without swapping out gels or filters.
Another massive advantage? Portability.
I once tried to lug a bunch of traditional lights up three flights of stairs for a shoot. Never. Again.
LED panels are lightweight and usually come with their own cases. Your back will thank you, trust me.
When you’re shopping for LED panel light kits, there are a few key features you’ll wanna keep an eye out for:
- Color temperature range (the wider, the better)
- Brightness (measured in lux)
- CRI (Color Rendering Index – aim for 95 or higher)
- Battery life (for those on-location shoots)
- Durability (because accidents happen, y’all)
Now, how do these fancy LED panels differ from traditional lighting options?
Well, besides being more energy-efficient and portable, they’re also way more flexible.
With traditional lights, you’re often stuck with a fixed color temperature and beam angle.
LED panels? You can adjust that stuff on the fly.
It’s like having a whole lighting studio in one compact package.
One thing I learned the hard way: don’t assume all LED panels are created equal.
I once cheaped out on a set for a low-budget music video, and man, the color accuracy was awful.
The artist’s skin tone looked like they’d spent a week on Mars.
Lesson learned: invest in quality gear, even if it means saving up a bit longer.
Pro Tip: Get a kit with barn doors. These little flaps on the sides of the panel let you control light spill like a boss.
I can’t tell you how many times they’ve saved my bacon when trying to create precise lighting in tight spaces.
So there you have it – a crash course in LED panel light kits for music videos.
They’re game-changers, folks.
Just remember: start small, experiment a lot, and don’t be afraid to make mistakes. That’s how we all learn in this biz!
Top LED Panel Light Kits for Music Video Production in 2024
Alright, let’s dive into the good stuff – the best LED panel light kits on the market right now.
I’ve been around the block a few times with these things, and let me tell ya, the options out there are pretty sweet.
Neewer 660 Pro II RGB LED Video Light
Neewer is known for offering affordable lighting solutions for content creators and videographers.
Key Features:
- 660 LEDs with RGB and bi-color options
- 0-100% dimming
- 360° rotation
- Built-in effects
- Bluetooth app control
Pros:
- Versatile color options
- Affordable price point
- Portable design
Cons:
- Build quality may not match higher-end brands
- App connectivity can be inconsistent
Buy Now: Neewer 660 Pro II
Amaran P60X
Key Features:
- RGBWW with CCT control
- 60W output
- 9 built-in effects
- Sidus Link app control
- Magnetic diffuser
Pros:
- High color accuracy
- Robust build quality
- Excellent app integration
Cons:
- Higher price point
- Heavier than some competitors
Buy Now: Amaran P60X
Aputure Nova P600C
Aputure is a well-respected brand in the professional videography and filmmaking industry.
Key Features:
- 600W output
- RGBWW with CCT control
- IP54 weather-resistant
- LumenRadio CRMX built-in
Pros:
- Extremely powerful output
- Professional-grade build and features
- Suitable for studio and location work
Cons:
- Very expensive
- Large and heavy
Buy Now: Aputure Nova P600C
Lume Cube Panel Pro
Lume Cube specializes in compact, portable lighting solutions for content creators.
Key Features:
- Bi-color 3200K-5600K
- 1500 LUX at 0.5m
- Built-in diffuser
- Bluetooth app control
Pros:
- Ultra-portable design
- Long battery life
- Easy to use for beginners
Cons:
- Limited power output compared to larger panels
- No RGB options
Buy Now: Lume Cube Panel Pro
Godox P260C Pro
Godox is known for providing professional-grade lighting equipment at competitive prices.
Key Features:
- RGBWW with CCT control
- 260W output
- 16 built-in effects
- 2.4G wireless control
- V-mount battery compatible
Pros:
- High power output
- Versatile color options
- Professional features at a competitive price
Cons:
- Heavier than some competitors
- App control not as refined as some high-end brands
Buy Now: Godox P260C Pro
Budget Recommendations
Under $200: The Neewer 660 Pro II is typically in this range, offering good value for beginners and budget-conscious creators.
$200-$500: The Godox P260C Pro and Lume Cube Panel Pro usually fall within this price bracket, providing more professional features at a mid-range price point.
$500-$1000: The Aputure Amaran P60X is often found in this range, offering high-quality output and robust build for more serious users.
$1000+: The Aputure Nova P600C is in this premium category, designed for high-end professional productions.
Remember, these are just my opinions based on my experiences. Your mileage may vary depending on your specific needs.
And hey, technology moves fast – by the time you read this, there might be some new hotshot kit on the market.
Always do your research and, if possible, try before you buy.
Nothing beats hands-on experience when it comes to choosing the right gear for your music video productions!
Setting Up Your LED Panel Light Kit for Optimal Results
Alright, folks, let’s get down to the nitty-gritty of setting up your LED panel light kit.
I’ve had my fair share of fumbles in this department, so I’m gonna share some hard-earned wisdom to save you some headaches.
Assembly
First things first, let’s talk about assembly.
Most LED panels these days are pretty straightforward to put together, but there’s always that one tricky bit, ain’t there?
I remember the first time I tried to attach a light to a stand – took me embarrassingly long to figure out I had the mounting bracket upside down.
Pro Tip: Take a sec to familiarize yourself with all the parts before you start. It’ll save you time and frustration in the long run.
Positioning
Now, when it comes to positioning your lights, think in terms of layers. There are a number of different light setup but if you want an easy / standard setup to start with go with the 3 point setup.
Key Light
Your key light (the main light source) should be placed at about a 45-degree angle to your subject.
I usually start with it slightly above eye level, but don’t be afraid to experiment.
Fill Light
Your fill light (which softens shadows) goes on the opposite side, a bit lower and less intense.
Backlight
And don’t forget about that backlight! It’ll help separate your subject from the background and add some depth to your shot.
Here’s a quick rundown of the 3 Point Setup:
- Backlight: This is great for separating your subject from the background. Try using a different color than your key light for some extra pop.
- Key light: Your main light source. With LEDs, you can easily adjust the intensity and color to suit your scene.
- Fill light: Use this to soften shadows. A nice trick is to use a slightly different color temperature than your key light for subtle depth.
Color and Brightness
Getting the right color temperature and brightness can be a bit of a dance.
Start with your key light and adjust from there.
A good rule of thumb is to match your color temp to the ambient light if you’re shooting in a mixed lighting situation.
But hey, rules are made to be broken in creative work, right?
I once did a music video where we deliberately mismatched the color temps for a surreal effect.
Looked weird as heck, but the artist loved it!
Depth and Dimension
Creating depth and dimension with multiple LED panels is where the magic happens.
Don’t just blast your subject with light from the front – that’s a recipe for flat, boring footage.
Play around with positioning lights at different angles and intensities.
Use some to light the background, others to create highlights on your subject.
It’s all about building layers of light to create a three-dimensional feel.
Now, let’s talk about some common mistakes to avoid:
- Overlooking spill: Light doesn’t just stop where you want it to. Use flags or barn doors to control where your light falls.
- Ignoring shadows: Shadows aren’t the enemy! They add depth and drama. Don’t try to eliminate them entirely.
- Forgetting about practical lights: Those lamps and fixtures in your scene? Use ’em! They can add a lot of character to your lighting.
- Not dimming enough: LED panels can be crazy bright. Don’t be afraid to dim them way down, especially for close-ups.
- Neglecting the background: Your subject might look great, but if the background’s dark and lifeless, your shot will suffer.
One time, I made the rookie mistake of not securing my light stands properly.
Halfway through the shoot, a gust of wind came through an open window and – BAM! – down went my key light, nearly taking out the lead singer.
Talk about a heart-stopping moment!
Lesson learned: always, ALWAYS make sure your video equipment is stable and secure.
Pro Tip: Bring more sandbags than you think you’ll need. They’re lifesavers for keeping your stands steady, especially if you’re shooting outdoors or in unpredictable locations.
Oh, and here’s something I wish someone had told me early on: invest in a good light meter.
Yeah, your camera’s built-in meter is okay, but a dedicated light meter will give you much more precise control over your lighting ratios.
Remember, setting up your LED panel light kit is as much an art as it is a science.
Don’t be afraid to break the “rules” and experiment.
Some of the coolest lighting effects I’ve achieved were happy accidents that came from just playing around with different setups.
So have fun with it, and keep pushing those creative boundaries!
Creative Lighting Techniques Using LED Panel Kits
Alright, buckle up, ’cause we’re about to dive into the fun stuff – creative lighting techniques with LED panel kits.
This is where you can really let your imagination run wild and create some seriously cool effects for your music videos.
Mood
First up, let’s talk about achieving different moods and atmospheres.
LED panels are perfect for this because of their color-changing capabilities.
Wanna create a moody, blue-tinted scene for a sad ballad? Easy peasy.
How about a warm, golden glow for a feel-good summer hit? No problem.
I once did a video where we used cool blues for the verses and switched to warm ambers for the chorus – the visual transition really helped emphasize the emotional shift in the song.
Color mixing is where things get really interesting.
Don’t be afraid to experiment with complementary or contrasting colors.
I remember doing a shoot where we used teal and orange LEDs to create this super vibrant, almost surreal look.
It took some trial and error to get the balance right, but the final result was epic.
Creating Shapes
One of my favorite techniques is using LED panels to create light “shapes” in the background.
You can use gobos or even just random objects in front of the light to cast interesting shadows.
I once used a piece of lace in front of an LED panel to create this dreamy, textured background light. Looked amazing!
Mixing Different Lights
Incorporating LED panels with other lighting equipment can lead to some really cool effects.
Try using them in conjunction with practical lights in your scene.
Or combine them with a hazer for some atmospheric beam effects. Just be careful with the haze – I once got a bit overzealous and set off the fire alarm. Oops!
Here’s a cool trick: use LED panels to create a “light box” effect. Set up panels on all sides of your subject, each with a different color. It creates this super cool, multi-colored glow that looks fantastic on camera.
Movement
Oh, and don’t forget about movement! Many LED panels these days come with built-in effects like strobe or chase.
These can be great for adding energy to upbeat songs or creating tension in slower ones.
Just use them sparingly – a little goes a long way.
One time, I was working on a video with a really tight budget. We couldn’t afford fancy moving lights, so I got creative.
I mounted an LED panel on a cheap camera slider and had an assistant slowly move it during the performance.
Instant poor man’s moving light!
Silhouettes
Another fun technique is using LED panels to create silhouettes.
Position your subject between the camera and the panel, crank up the intensity, and boom – instant dramatic silhouette.
Remember, the key to great lighting is experimentation. Don’t be afraid to try weird things.
Some of my best lighting setups have come from happy accidents or “what if” moments.
And hey, if something doesn’t work, no biggie.
That’s the beauty of LED panels – you can change things up in seconds.
Pro Tip: Always keep your artist in mind when designing your lighting.
What works for a high-energy pop video might not be right for a intimate acoustic performance.
Talk to the artist, understand their vision, and use your lighting to enhance the mood and emotion of the song.
So there you have it – some of my favorite creative lighting techniques using LED panel kits.
Now get out there and start experimenting. Who knows? You might just create the next big trend in music video lighting!
Enhancing Your Music Video Production with LED Panel Light Kits
Alright, let’s talk about taking your music video production to the next level with LED panel light kits.
Trust me, once you start playing around with these bad boys, you’ll wonder how you ever managed without ’em.
Synchronizing
First up, let’s dive into synchronizing LED panel lights with music. This is where things get really fun.
Most high-end LED panels these days come with DMX control, which means you can hook them up to a lighting board or even your computer.
I remember the first time I saw synced lights to a beat – it was for a EDM video, and man, did it look sick!
The key is to not overdo it.
You don’t want your video looking like a chaotic light show at a rave (unless that’s what you’re going for, of course).
Custom Light Shows
Creating custom light shows and sequences is another way to really make your video pop.
Most LED panel kits come with some built-in effects, but don’t be afraid to create your own.
I once spent an entire day trying to program a custom light sequence for a rock ballad.
It was a pain in the butt at the time, but the end result was totally worth it.
The lights pulsed and faded in perfect harmony with the music, creating this really emotional atmosphere.
Green Screen
Now, let’s talk about using LED panels for green screen and chroma key effects. This is a game-changer, folks.
The even, bright light you get from LED panels is perfect for lighting your green screen.
Just make sure you position them to minimize shadows and hotspots.
I learned this the hard way on one shoot – spent hours in post trying to key out a badly lit green screen. Never again!
Editing Software
Integrating LED panel lights with video editing software is where the magic really happens.
A lot of modern LED panels can be controlled via software, which means you can program your light changes right in your timeline.
It’s like having a virtual lighting designer right in your editing suite.
Just be careful not to go overboard – I once got so caught up in creating cool lighting effects that I forgot to focus on the actual edit. Oops!
Here are some quick tips for enhancing your music video production with LED panels:
- Use color to enhance mood: Cool blues for sad scenes, warm oranges for happy ones.
- Create depth with backlight: A rim of light can make your subject pop.
- Experiment with moving lights: Even a simple pan can add dynamic energy.
- Don’t forget practicals: Use LED panels to boost the output of practical lights in your scene.
One cool technique I’ve been experimenting with lately is using LED panels for projection effects.
By placing textured objects in front of the panel, you can create some really interesting light patterns on your background or subject.
It’s a great way to add visual interest without breaking the bank on expensive projectors.
Pro Tip: Always bring more batteries than you think you’ll need.
Conclusion
Lights, camera, and that’s a wrap!
With the right LED panel light kit, you’re now equipped to create stunning music videos that’ll have your audience hitting replay.
Remember, great lighting can make or break your production, so invest wisely and let your creativity shine!
Whether you’re a seasoned pro or just starting out, these LED panel light kits will help you craft visuals that are truly music to the eyes.
So, what are you waiting for? It’s time to light up your next music video and watch your views soar!

