Are you ready to take your audio game to the next level?
Whether you’re a budding podcaster, a seasoned musician, or a voiceover artist, having the right condenser microphone can make all the difference!
Condenser mics are used in professional recording studios worldwide because they offer unparalleled sensitivity and frequency response.
But with so many options out there, how do you choose the best one for your needs? Don’t worry, we’ve got you covered!
In this comprehensive guide, we’ll explore the top 10 best condenser microphones of 2024, helping you find the perfect match for your audio aspirations.
What is the Best Condenser Microphone?
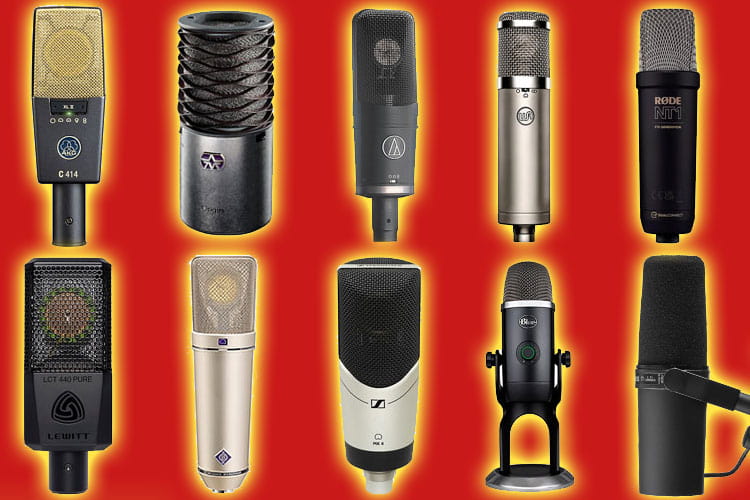
Here are my top picks for the best condenser microphones this year.
Alright, buckle up, folks! We’re about to dive into the crème de la crème of condenser mics for 2024.
Now, I’ve had my fair share of experiences with these bad boys, so I’ll give you the lowdown on each one.
1. The Neumann U87 Ai

This is like the Rolls-Royce of condenser mics. It’s got a warm, balanced sound that’ll make your recordings shine. It’s also considered by some as the best microphone for recording vocals.
- Pros: Incredible sound quality, versatile.
- Cons: It costs more than my first car!
- Best for: Professional studio recordings.
2. AKG C414 XLII

This mic is a chameleon. It’s got multiple polar patterns, so it’s super versatile. I once used it to record a whole band with just this one mic!
- Pros: Versatile, great for vocals and instruments.
- Cons: Can be a bit bright for some tastes.
- Best for: All-around studio use.
Shure SM7B

Okay, technically it’s a dynamic mic, but it’s so good it had to make the list. It’s a podcaster’s dream.
- Pros: Incredible vocal clarity, built like a tank.
- Cons: Needs a lot of gain.
- Best for: Podcasting, broadcast, and close-miked vocals.
4. Rode NT1

This is a great entry-level option. I started with one of these, and it served me well for years.
- Pros: Low self-noise, good value for money.
- Cons: Single polar pattern.
- Best for: Home studio recording.
5. Blue Yeti X

Perfect for the streaming crowd. It’s plug-and-play, which is great when you’re just starting out.
- Pros: Easy to use, multiple polar patterns.
- Cons: Not the most refined sound.
- Best for: Streaming, podcasting.
6. Sennheiser MK 4

This mic is like that reliable friend who’s always there for you. Solid performance across the board.
- Pros: Clear sound, rugged build.
- Cons: Can be a bit harsh on sibilant voices.
- Best for: Vocals and acoustic instruments.
7. Audio-Technica AT4050

Another versatile beast. Great for everything from vocals to drum overheads.
- Pros: Multiple polar patterns, smooth sound.
- Cons: Might be overkill for beginners.
- Best for: Professional studio use.
8. Warm Audio WA-47Jr

This is like a taste of vintage without breaking the bank. It’s got that classic tube warmth.
- Pros: Great on vocals, affordable.
- Cons: Single polar pattern.
- Best for: Adding warmth to digital recordings.
9. Aston Origin

A relative newcomer, but don’t let that fool you. This mic punches way above its weight class.
- Pros: Great sound, unique look.
- Cons: Fixed cardioid pattern.
- Best for: Home studio vocals and instruments.
10. Lewitt LCT 440 PURE

This mic is like finding a hidden gem. It’s not as well-known as some others, but it delivers the goods.
- Pros: Clean sound, good value.
- Cons: Might be too neutral for some.
- Best for: Detailed studio recordings.
Now, I’ve gotta say, prices on these bad boys can fluctuate faster than my mood during a difficult mix.
But generally, you’re looking at anywhere from $100 for the budget-friendly options to several grand for the top-tier stuff.
Remember, the “best” mic is the one that works for your specific needs and budget.
I once blew a whole paycheck on a fancy mic, only to realize it wasn’t the right fit for my voice.
Learn from my mistakes, folks!
When choosing, consider what you’ll be using it for.
- Are you podcasting? Go for something like the Shure SM7B or Rode NT1.
- Recording vocals? The Neumann U87 Ai or AKG C414 XLII might be your jam.
- On a tight budget? The Blue Yeti X or Aston Origin could be your new best friend.
At the end of the day, any of these mics can sound amazing in the right hands.
It’s all about finding the one that vibes with you and your sound. Happy mic hunting!
Understanding Condenser Microphones: The Basics
When I first started figuring out the music production basics, I was totally clueless about condenser mics.
I mean, I knew they were fancy and all, but I couldn’t tell you the difference between a condenser and a dynamic mic if my life depended on it!
So, what are condenser microphones? Well, they’re these super-sensitive beasts that use a thin, electrically-charged diaphragm to capture sound.
Unlike their dynamic cousins, condensers need phantom power to work their magic. It’s like they’re the divas of the mic world, always needing that extra juice to perform!
I remember this one time, I was trying to record a podcast with my buddy, and I couldn’t figure out why my shiny new condenser mic wasn’t picking up squat.
Turns out, I forgot to switch on the phantom power on my interface. Talk about a facepalm moment!
When it comes to the differences between condensers and dynamics, it’s like comparing a sports car to a pickup truck.
Condensers are all about that crisp, detailed sound. They’re super responsive and can pick up the tiniest nuances in your voice or instrument.
Dynamics, on the other hand, are like the workhorses of the audio world. They’re tough, reliable, and can handle high sound pressure levels without breaking a sweat.
Now, if you’re in the market for one of the best condenser microphones, there are a few key features you’ll wanna keep an eye out for:
- Frequency response: Look for a mic that can capture a wide range of frequencies
- Sensitivity: Higher sensitivity means it can pick up softer sounds
- Polar pattern: This determines how the mic picks up sound from different directions
- Self-noise: Lower self-noise means cleaner recordings
I learned about these the hard way, believe me. I once bought a cheap condenser mic thinking I was getting a steal, only to find out it had more self-noise than a room full of chatty teenagers!
As for applications, condenser mics are pretty versatile little buggers. They’re awesome for:
- Studio vocal recordings
- Capturing acoustic instruments
- Podcasting and voiceovers
- Overhead drum mics
- Room ambience and foley work
I’ve used condenser mics for all sorts of stuff over the years. Heck, I even tried using one to record my dog growling.
Spoiler alert: it didn’t go well. Ended up with a lot of fur on my pop filter and a very annoyed dog!
That’s the 411 on condenser mics. They might seem a bit intimidating at first, but once you get the hang of ’em, they’re like the Swiss Army knives of the audio world.
Just remember to switch on that phantom power, and you’ll be golden!
Factors to Consider When Choosing a Condenser Microphone

Choosing the right condenser mic can feel like trying to pick the perfect avocado at the grocery store – it ain’t always easy, but it’s worth the effort!
Budget
First up, let’s talk budget. I remember when I was starting out, I thought I needed to sell a kidney to afford a decent mic.
But here’s the thing – you don’t need to break the bank to get a good sound. There are some killer options out there for every price point.
That being said, generally speaking, you get what you pay for.
Just don’t go blowing your life savings on a mic if you’re just starting out, okay?
Intended Use
Next, think about your intended use. Are you planning to record the next chart-topping hit in your home studio setup? Or maybe you’re looking to start the hottest new podcast?
Each scenario calls for a different type of mic.
For studio recording, you might want something with a flatter response for accuracy.
For podcasting, a mic with a bit of a presence boost can help your voice cut through.
Polar Patterns
Now, let’s chat about polar patterns. This is basically how the mic picks up sound from different directions.
The main ones you’ll come across are:
- Cardioid: Picks up sound from the front (great for isolating your source)
- Omnidirectional: Picks up sound from all directions (good for room ambience)
- Figure-8: Picks up sound from the front and back (perfect for interviews)
I once tried to record a duet using a cardioid mic, thinking I could just have both singers on either side. Spoiler alert: it didn’t work.
Frequency Response
Frequency response is another biggie. This tells you how the mic handles different frequencies.
Some mics are ruler-flat, while others have a “character” to them.
For example, a mic with a slight boost in the high-mids can add some sparkle to vocals.
Sensitivity
Don’t forget about sensitivity. A more sensitive mic will pick up quieter sounds, which can be great for intimate recordings.
But if you’re mic’ing up a drum kit or a loud guitar amp, you might want something that can handle high SPLs (sound pressure levels) without distorting.
Now, let’s talk about some extra features that can make your life easier:
- Built-in pop filters: These can help tame those pesky plosives (p and b sounds)
- Shock mounts: Great for reducing handling noise and vibrations
- Pads: These let you record louder sources without distortion
- Low-cut filters: Helpful for reducing low-end rumble
I once bought a mic without a shock mount and tried to DIY one with rubber bands. Let’s just say it didn’t end well.
Save yourself the trouble and consider these features when buying!
Remember, at the end of the day, the best mic is the one that works for you and your specific needs.
Don’t get too caught up in the specs and forget to use your ears.
And hey, if you’re still unsure, see if you can try out a few different mics before making your decision.
Setting Up Your Condenser Microphone for Optimal Performance

Alright, let’s get down to the nitty-gritty of setting up your condenser mic.
Trust me, I’ve made every mistake in the book when it comes to this, so learn from my blunders!
Placement
First things first, placement is key. I can’t tell you how many times I’ve recorded a whole session only to realize my mic was in the wrong spot.
For vocals, you generally want the mic slightly above mouth level, angled down towards the mouth.
This helps reduce plosives (those pesky ‘p’ and ‘b’ sounds) and sibilance (hissy ‘s’ sounds).
For instruments, it’s a bit of a trial and error process. With acoustic guitars, I like to start by pointing the mic at the 12th fret, about 6-12 inches away.
For piano, try a pair of mics – one over the high strings and one over the low strings. Experiment and trust your ears!
Acoustic Treatment
Now, let’s talk about acoustic treatment.
When I first started out, I thought I could get away with recording in my untreated bedroom. Big mistake!
Reflections from hard surfaces can really mess with your sound.
You don’t need to go crazy, but even some DIY studio soundproofing can make a world of difference.
Here are some quick tips for basic acoustic treatment:
- Use thick curtains or blankets to cover windows
- Place a rug on hardwood floors
- Use acoustic foam panels on walls to reduce reflections
- Consider a reflection filter behind your mic for extra isolation
Connecting
Next up, connecting to audio interfaces and preamps.
Make sure you’re using a good quality XLR cable – I learned the hard way that cheap cables can introduce noise.
And don’t forget to turn on that phantom power!
I can’t tell you how many times I’ve scratched my head wondering why my mic wasn’t working, only to realize I forgot to switch on the 48V.
When it comes to gain staging, start low and gradually increase until you’re getting a good signal without clipping.
Remember, it’s always better to record a bit quieter than to risk distortion.
Background Noise
Now, let’s tackle the beast that is background noise.
Nothing ruins a recording faster than unwanted noise.
Here are some tips I’ve picked up over the years:
- Turn off any noisy appliances (fridges, air conditioners, etc.)
- Use a pop filter to reduce plosives
- Consider recording late at night when external noise is minimal
- Use a noise gate plugin during mixing to clean up any remaining noise
I once tried to record vocals with my fridge running in the background.
Let’s just say the constant hum didn’t add the ambience I was hoping for!
Interference
Another thing to consider is interference.
Keep your mic cables away from power cables to avoid electromagnetic interference.
And if you’re using a USB mic, make sure it’s plugged directly into your computer, not through a hub.
Monitoring
Lastly, don’t forget about monitoring. Use closed-back headphones to prevent spill when recording.
And if you’re doing overdubs, make sure your headphone mix is balanced – too much of the backing track can lead to pitch problems.
Remember, setting up your mic correctly is half the battle.
Take the time to get it right, and your recordings will thank you.
And hey, if all else fails, there’s always the tried and true method of shouting into the mic from across the room. (Just kidding, please don’t do that!)
Maintenance and Care for Your Condenser Microphone

Alright, folks, let’s rap about keeping your precious condenser mic in tip-top shape.
Cleaning
First up, cleaning. Now, I know it’s tempting to go all out with the cleaning supplies, but hold your horses!
Condenser mics are delicate beasts. I once made the mistake of using a damp cloth on my mic, and let’s just say it didn’t end well.
Stick to a soft, dry brush for the grille and a microfiber cloth for the body.
And for heaven’s sake, don’t blow into the mic to clean it – you’ll just end up with a mouthful of dust and a mic full of moisture!
Humidity and Temperature
Speaking of moisture, let’s talk humidity and temperature. These mics are like Goldilocks – they like everything just right.
Too much humidity can lead to condensation inside the mic, which is bad news bears.
On the flip side, super dry conditions can make the capsule brittle.
I keep my mics in a climate-controlled room, but if that’s not possible, consider using silica gel packs in your mic case.
Storage
Now, about storage. I learned this one the hard way when I left my mic out on the stand for months. Bad idea.
When you’re not using your mic, store it upright in its case.
This helps prevent dust from settling on the capsule and keeps the mic safe from accidental bumps and drops.
Here’s a quick checklist for proper storage:
- Store upright in a padded case
- Keep in a cool, dry place
- Use silica gel packs to control moisture
- Avoid direct sunlight
Components
Let’s chat about replacing components. Capsules and cables don’t last forever, unfortunately.
If you start noticing a drop in sound quality or increased noise, it might be time for a replacement.
I once tried to squeeze a few more months out of a dying cable, and it chose to give up the ghost right in the middle of a crucial recording session. Not fun.
Troubleshooting
Now, onto troubleshooting. Here are some common issues I’ve run into:
- No sound: Check your phantom power and cables
- Distortion: Could be a damaged capsule or too much input gain
- Excessive noise: Might be a bad cable or interference from other electronics
- Intermittent sound: Usually a cable issue, but could also be a loose connection in the mic
Remember, if you’re not comfortable poking around inside your mic, it’s best to leave it to the professionals.
I once thought I could fix a loose connection myself and ended up with a very expensive paperweight.
Longevity
Lastly, let’s talk about longevity. Treat your mic right, and it’ll be with you for years.
Here are some tips for making your mic last:
- Always use a pop filter to protect the capsule
- Never hot-swap cables (unplug before connecting/disconnecting)
- Avoid exposing the mic to smoke or other harsh environments
- Consider using a shock mount to protect from vibrations
Remember, a little TLC goes a long way with condenser mics.
Treat ’em right, and they’ll make you sound like a million bucks for years to come.
Final Thoughts on the Best Condenser Microphones
There you have it, folks! Our rundown of the best condenser microphones for 2024 is sure to help you find the perfect audio companion for your projects.
Remember, the right mic can elevate your sound from good to extraordinary!
Whether you’re laying down tracks in a professional studio or recording your next viral podcast episode, investing in a quality condenser microphone is a decision you won’t regret.
So, what are you waiting for? It’s time to upgrade your audio game and let your voice be heard in crystal-clear clarity. Happy recording!