Hey there, aspiring music producer! Ready to turn those beats in your head into chart-topping hits? You’re in the right place!
Did you know that 68% of music consumers prefer original compositions over remixes? That’s right – your unique sound could be the next big thing!
In this guide, we’ll walk you through the essentials of music production basics, giving you the tools and knowledge to kickstart your journey in the exciting world of music creation.
From setting up your home studio to understanding how to produce music and key production techniques, we’ve got you covered. Let’s dive in and unleash your inner music maestro!
Setting Up Your Home Studio

Let me tell you, setting up your first home studio can be both exciting and overwhelming!
When I started out, I made the classic mistake of blowing my entire budget on a fancy microphone, only to realize I had no way to actually record with it. Rookie error, right?
Essentials
First things first, you’ll need some essential equipment to get rolling.
A decent audio interface is crucial – it’s what lets you connect your instruments and mics to your computer.
I remember trying to use my laptop’s built-in mic for recording… let’s just say the results were less than stellar!
For beginners, I’d recommend starting with the following:
- simple USB audio interface
- a pair of studio monitors (or good headphones if you’re on a tight budget),
- a versatile microphone for recording vocals and instruments
Don’t forget cables! I once had everything set up and ready to go, only to realize I didn’t have the right cables to connect it all. Facepalm moment for sure.
DAW
Choosing the right Digital Audio Workstation (DAW) is another biggie. T
here are tons of options out there, from free ones like Audacity to pro-level software like Pro Tools.
I started with Reaper, which has a generous free trial period and is pretty affordable if you decide to buy it.
It’s all about finding what works for you and your workflow.
Acoustics
Now, let’s talk about acoustics. This is where things can get tricky (and expensive) real quick. But don’t worry, you don’t need to go all out right away.
When I first started, I hung up some heavy blankets on my walls to dampen reflections. It wasn’t pretty, but it did the job!
Here are some budget-friendly alternatives for studio gear:
- Use a closet full of clothes as a vocal booth
- Make your own pop filter with a coat hanger and pantyhose
- Use foam yoga blocks for speaker isolation
Remember, it’s not about having the fanciest gear – it’s about making the most of what you’ve got.
I’ve heard some amazing tracks produced in bedrooms with basic setups.
The key is to learn your equipment inside and out.
Pro Tip: Don’t forget about ergonomics! I spent months hunched over a too-low desk before realizing why my back was always killing me.
Your home studio setup should be a comfortable environment made for long sessions. Trust me, your future self will thank you!
Understanding Music Theory for Production
Alright, let’s dive into the world of music theory for production.
Now, I know what you’re thinking – “Ugh, theory? Boring!” But hear me out.
Understanding even the basics can seriously level up your production game.
Let’s start with some key concepts: scales, chords, and progressions. These are like the building blocks of music.
Scales
I remember when I first learned about the major scale – it was like someone had handed me the keys to the musical kingdom!
Suddenly, I understood why certain notes sounded good together and others… well, not so much.
This diagram illustrates the structure of the major scale, which follows the pattern:
Whole – Whole – Half – Whole – Whole – Whole – Half
- The notes of the C major scale (C, D, E, F, G, A, B, C) are shown across the top.
- Below the notes, you’ll see the scale degrees (1, 2, 3, 4, 5, 6, 7, 8).
- At the bottom, the whole steps (W) and half steps (H) between each note are indicated.

Chords
Chords are another game-changer. Once you get how they’re built, you can start creating more interesting harmonies in your tracks.
I used to just throw random notes together and hope for the best.
Now, I can build chords that actually make sense and sound good. It’s like magic, I swear!
If you need a little help check out this Chord Player by Musicca. It will get you started putting together chords that work well together.
Progressions
Progressions are where things really get fun. They’re basically the roadmap for your song.
I love experimenting with different progressions to see how they change the feel of a track.
Sometimes, just switching up the order of your chords can take a song from “meh” to “wow!”
Below is a diagram that builds on the previous major scale visualization to show how chord progressions work.
This new diagram includes the following elements:
- The notes of the C major scale (C, D, E, F, G, A, B, C) are shown at the top.
- Below the notes, you’ll see the Roman numeral notation for each chord in the scale (I, ii, iii, IV, V, vi, vii°).
- The third row shows the actual chord names (C, Dm, Em, F, G, Am, B°).
- At the bottom, I’ve included examples of common chord progressions using both Roman numeral notation and the actual chord names in C major.

- Chords in a major scale: The diagram shows how each note of the scale becomes the root of a chord. Major chords are represented by uppercase Roman numerals (I, IV, V), while minor chords use lowercase (ii, iii, vi). The vii° represents a diminished chord.
- Chord progressions: These are sequences of chords that form the harmonic foundation of a song. The examples shown are some of the most common progressions in popular music.
- Roman numeral notation: This system allows musicians to describe chord progressions independently of the key, making it easy to transpose songs.
- Actual chord names: The diagram provides examples in the key of C major, showing how the Roman numeral notation translates to specific chords in this key.
Some common progressions highlighted in the diagram:
- I – V – vi – IV (C – G – Am – F): Used in many pop songs
- I – IV – V (C – F – G): A classic progression in rock and blues
- ii – V – I (Dm – G – C): Common in jazz music
- I – vi – IV – V (C – Am – F – G): Another popular progression in many genres
This visualization should help you understand how chords are derived from the major scale and how they’re commonly used in progressions. It also demonstrates the relationship between Roman numeral notation and actual chord names in a specific key.
Rhythm and Tempo
Now, let’s talk about rhythm and tempo. These are super important in music production basics, especially if you’re making anything dance-oriented.
I learned this the hard way when I made a track that was impossible to dance to because the rhythm was all over the place. Oops!
Understanding time signatures and how to use them can really help you create more interesting rhythms.
And don’t be afraid to play around with tempo and experiment with some beat making software.
I once accidentally left my DAW set to half-speed and ended up with this cool, slow-mo version of my track. Happy accidents, right?
Below is diagram that illustrates how different time signatures work in music.
This visualization includes examples of four common time signatures: 4/4, 3/4, 6/8, and 2/2.
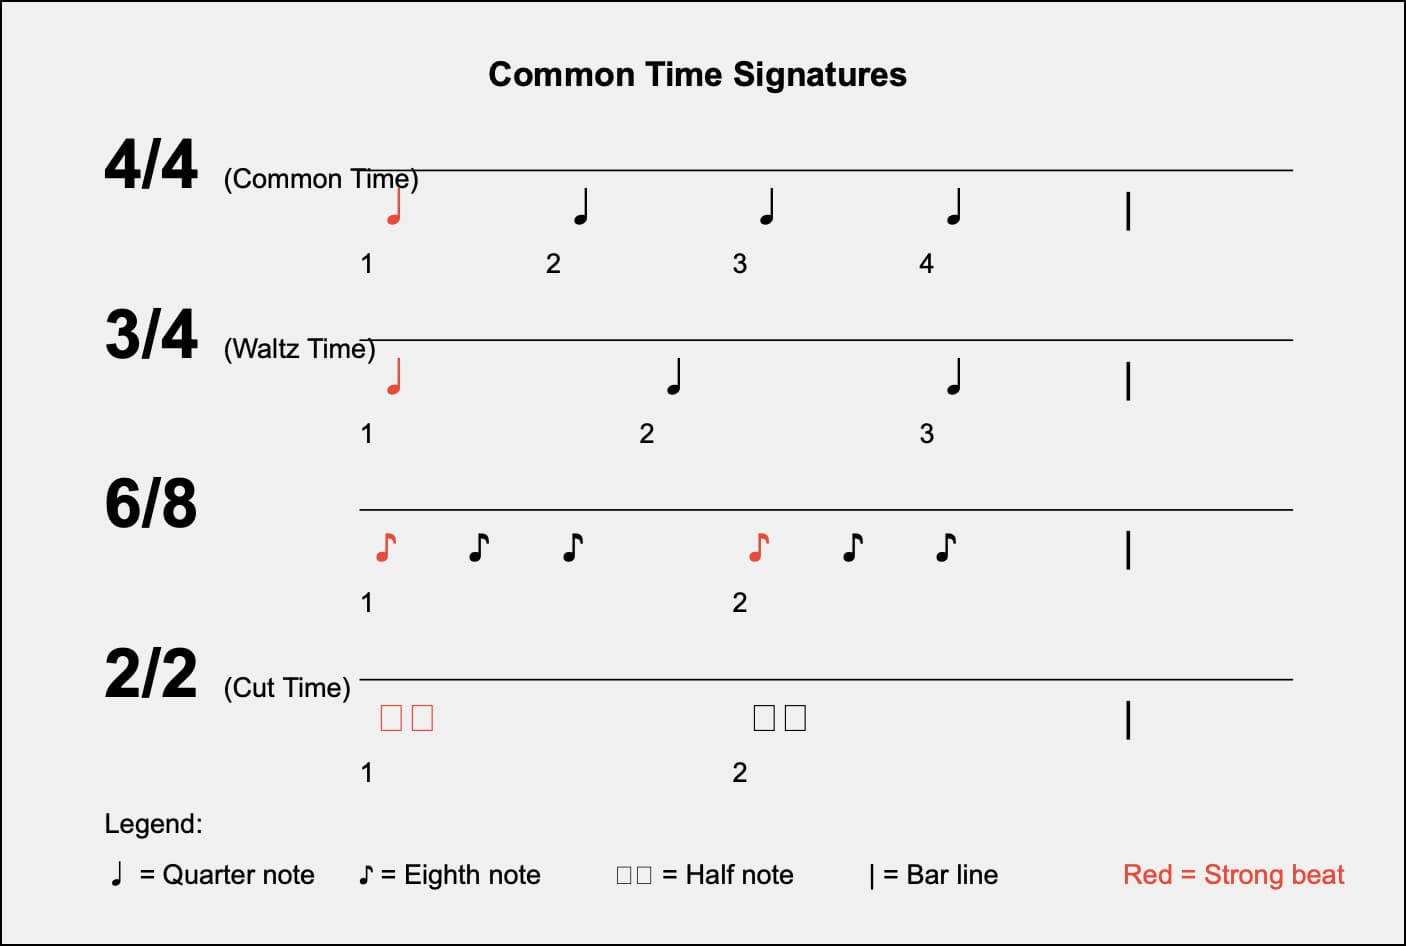
Here’s an explanation of the elements in the diagram:
- Time Signature Notation: The large numbers at the left of each row show how the time signature is written in musical notation.
- Beat Division: For each time signature, I’ve shown how the beats are divided within a single measure.
- Note Values: The diagram uses standard musical notation for quarter notes (♩), eighth notes (♪), and half notes (𝅗𝅥).
- Strong Beats: The first beat of each measure is shown in red to indicate it’s typically emphasized or accented.
- Beat Counting: Below each measure, you can see how musicians typically count these rhythms.
Here’s a brief explanation of each time signature shown:
- 4/4 Time (Common Time):
- Four beats per measure, each beat is a quarter note.
- Counted as “1, 2, 3, 4”
- Also known as “Common Time” and sometimes notated with a C symbol.
- 3/4 Time:
- Three beats per measure, each beat is a quarter note.
- Counted as “1, 2, 3”
- Often used for waltzes, hence sometimes called “Waltz Time”.
- 6/8 Time:
- Six beats per measure, each beat is an eighth note.
- Usually felt as two main beats, each divided into three.
- Counted as “1, 2, 3, 4, 5, 6” or more commonly as “1-and-a, 2-and-a”
- 2/2 Time (Cut Time):
- Two beats per measure, each beat is a half note.
- Counted as “1, 2”
- Also known as “Cut Time” and sometimes notated with a C with a vertical line through it.
Key points:
- The top number in a time signature indicates how many beats are in each measure.
- The bottom number indicates which note value represents one beat (4 = quarter note, 8 = eighth note, 2 = half note).
- The first beat of a measure (shown in red) is typically the strongest, with secondary strong beats depending on the time signature.
- Different time signatures create different rhythmic feels and are often associated with particular styles of music.
This visualization should help beginners understand how time signatures structure the rhythm of music and how they’re represented in musical notation.
Harmonization
Harmonization is another cool technique to explore.
It’s all about adding extra notes to your melodies to make them sound fuller and richer.
I love using harmonies to beef up my vocal tracks or create more interesting synth lines.
Here are some tips for applying music theory to enhance your tracks:
- Use the circle of fifths to find chords that work well together
- Experiment with different scale modes to change the mood of your melodies
- Try using secondary dominants to add some spice to your chord progressions
Below is a comprehensive diagram that illustrates the Circle of Fifths and demonstrates how it relates to harmonization.
This visualization includes the following elements:
- Circle of Fifths:
- The outer circle shows the major keys, progressing clockwise in perfect fifths (C – G – D – A – E – B – F♯/G♭ – D♭ – A♭ – E♭ – B♭ – F).
- The inner circle shows the relative minor keys for each major key.
- Harmonization Example:
- Below the circle, there’s an example of harmonization in the key of C major.
- It shows the chords built on each degree of the C major scale, using Roman numeral notation and chord names.
- Scale Degrees:
- The notes of the C major scale are listed, along with their scale degree numbers.
- Legend:
- Explains the color coding used for major, minor, and diminished chords/keys.

Key Points:
- Circle of Fifths:
- It’s a visual representation of the relationships among the 12 tones of the chromatic scale, their corresponding key signatures, and the associated major and minor keys.
- Moving clockwise, each key is a perfect fifth above the previous one.
- Adjacent keys in the circle are closely related harmonically.
- Harmonization:
- Harmonization involves building chords on each degree of a scale.
- In a major key, the pattern of chords is always: Major, minor, minor, Major, Major, minor, diminished.
- This is represented by the Roman numerals: I, ii, iii, IV, V, vi, vii°.
- Relationship between Circle of Fifths and Harmonization:
- The Circle of Fifths helps in understanding key relationships and modulations.
- It can be used to find closely related keys for chord progressions and modulations.
- TheV-I (dominant-tonic) relationship, fundamental to harmony, is represented by adjacent keys in the circle.
- Practical Applications:
- Composers and songwriters use the Circle of Fifths to create chord progressions and modulations.
- It’s useful for transposition, as moving clockwise raises the key by a fifth, and counterclockwise lowers it by a fifth.
- Understanding the Circle of Fifths helps in predicting chord progressions and key changes in music.
This visualization ties together several important concepts in music theory: scales, keys, chord construction, and harmonic relationships.
It demonstrates how these elements are interconnected and provides a powerful tool for understanding and analyzing music.
Remember, theory is just a tool. Don’t let it stifle your creativity!
I spent way too long trying to make everything “theoretically correct” and ended up with some pretty boring tracks.
Now, I use theory as a starting point, but I’m not afraid to break the rules if it sounds good.
One last thing – don’t worry if you don’t get it all at once. Music theory can be overwhelming, but it’s not a race.
Take your time, focus on one concept at a time, and most importantly, have fun with it!
Before you know it, you’ll be throwing around terms like “Neapolitan sixth” like a pro.
Or maybe that’s just me being a theory nerd. Either way, keep at it!
Mastering the Art of Sampling and Sound Design
Alright, let’s get into the nitty-gritty of sampling and sound design. This is where you can really let your creativity shine!
But first, a word of caution: always, always, ALWAYS check the legal side of sampling.
Trust me, you do not want to deal with copyright issues down the line. Been there, done that, got the cease and desist letter.
When it comes to sampling, it’s all about finding unique sounds and using them in creative ways.
I once sampled the sound of my dog’s collar jingling and turned it into a hi-hat pattern.
Weird? Maybe. Cool? Definitely!
Don’t be afraid to think outside the box.
Synthesizers
Now, let’s talk synthesizers. These bad boys are your best friends when it comes to creating unique sounds.
I remember the first time I really dove into synthesis – it was like discovering a whole new universe of sound!
Start with basic waveforms and learn how to shape them with envelopes and filters.
Before you know it, you’ll be creating sounds you never even knew were possible.
Layering
Layering and blending samples is another key technique. It’s like being a chef, but with sound instead of food.
You might start with a basic drum loop, then layer in some live percussion samples to give it more texture.
Or blend different synth sounds to create something totally unique.
Just be careful not to go overboard – I’ve definitely been guilty of the “more is more” approach, only to end up with a muddy mess.
Effects
Effects are your secret weapon for transforming sounds.
A little bit of reverb here, a touch of delay there, and suddenly your boring old sample is a whole new beast.
I love using pitch-shifting effects to create otherworldly sounds.
Just be careful with the autotune – unless you’re going for that robot voice sound, in which case, go nuts!
Here are some tips for effective sampling and sound design:
- Always keep your ears open for interesting sounds in everyday life
- Experiment with extreme effect settings – you never know what you might discover
- Don’t be afraid to combine different techniques – maybe run your synth through a guitar pedal?
One thing I’ve learned is that limitation can breed creativity.
Try setting yourself challenges, like creating a whole track using only sounds sampled from your kitchen.
You’d be surprised at what you can come up with!
Remember, there are no rules in sound design. If it sounds good, it is good.
I once accidentally routed my audio wrong and ended up with this crazy feedback loop that became the main element of my track.
Happy accidents, people!
Resampling
And don’t forget about the power of resampling.
Take a sound you’ve created, record it, and then manipulate it further. It’s like sound design inception!
I love doing this with vocal samples – by the time I’m done, they’re often unrecognizable from the original.
Lastly, don’t get too precious about your sounds.
Sometimes, the best thing you can do is just scrap everything and start fresh.
I’ve spent hours tweaking a sound only to realize it just wasn’t working in the context of the track. It’s all part of the process!
Mixing Techniques for Clarity and Balance
Alright, let’s talk mixing. This is where the rubber meets the road, folks.
A great mix can make a good track amazing, while a bad mix can turn a potential hit into a muddy mess.
Trust me, I’ve been on both ends of that spectrum and it’s worth learning how to mix music!
EQ
First up, let’s dive into EQ fundamentals. This is your secret weapon for achieving crisp, clear mixes.
I remember when I first started out, I’d just boost the hell out of everything because I thought louder = better. Spoiler alert: it doesn’t.
The key is to be surgical with your EQ. Cut out the frequencies you don’t need to make room for the ones you do.
Here’s a little trick I learned: try using subtractive EQ before you reach for those boost knobs.
It’s like carving a sculpture – you’re removing the parts you don’t need to reveal the beauty underneath.
And don’t forget about those sneaky low-end frequencies. They can really muddy up your mix if you’re not careful.
Here’s a starting point for EQing your mix:
- High-pass filter: Cut low frequencies (below 100 Hz) on non-bass instruments to reduce mud.
- Low-pass filter: Remove unnecessary high frequencies (above 18 kHz) to reduce harshness.
- Cut before boost: Reduce problematic frequencies rather than boosting desired ones.
- Subtle changes: Use small adjustments (2-3 dB) for a more natural sound.
- Listen in context: Make EQ decisions while the full mix is playing.
- Focus on problem areas: Address frequency masking between instruments.
- Use reference tracks: Compare your mix to professional recordings in your genre.
Compression
Now, let’s talk about compression. This is where things can get tricky.
Compression is like seasoning in cooking – a little bit can enhance the flavor, but too much can ruin the dish.
I’ve definitely been guilty of over-compressing in the past.
Now, I try to use compression more subtly, to glue elements together and add punch where needed.
One cool technique I love is parallel compression.
It’s like having your cake and eating it too – you get the punch of heavy compression while still maintaining the dynamics of the original signal.
Give it a try on your drum bus – you might be surprised at the results!
Here are some audio compression tips for beginners in music production:
- Threshold: Set the level at which compression begins.
- Ratio: Determine how much compression is applied (e.g., 4:1).
- Attack: Adjust how quickly compression starts (faster for transients).
- Release: Set how quickly compression stops (longer for smoother sound).
- Make-up gain: Boost the overall level to compensate for volume reduction.
- Start subtle: Begin with gentle settings (2:1 ratio, slow attack, fast release).
- Listen for changes: Focus on how compression affects dynamics, not just volume.
- Use on individual tracks: Apply compression to separate instruments before the full mix.
Reverb and Delay
Reverb and delay are your best friends when it comes to creating depth and space in your mix.
But be careful – it’s easy to go overboard and end up with a washy, undefined mess.
I like to use sends for my reverbs and delays, so I can control exactly how much of each element is getting wet.
And don’t forget about pre-delay! It can really help keep things clear, even with longer reverb tails.
Here are some tips for using reverb and delay effectively:
- Use shorter reverbs on rhythmic elements to maintain clarity
- Try using delay instead of reverb for a cleaner sound
- Experiment with different reverb types for different elements of your mix
Panning
Stereo imaging and panning are crucial for creating wide, spacious mixes.
I love using stereo widening plugins on synths and pads to push them out to the sides, leaving plenty of room in the center for vocals and bass.
Just be careful not to push things too wide – you want your mix to still sound good in mono!
One mistake I used to make was panning everything to extremes.
Now, I try to think of panning more like placing instruments on a stage.
Some things might be hard left or right, but most elements will fall somewhere in between.
Remember, mixing is as much an art as it is a science. Trust your ears, but also learn to use reference tracks.
I always keep a few professionally mixed tracks in my session to compare against.
It’s amazing how much you can learn just by A/B’ing your mix with the pros!
And don’t forget to take breaks! Ear fatigue is real, folks.
I can’t tell you how many times I’ve stayed up all night tweaking a mix, only to listen back in the morning and realize I’ve made a complete mess of things.
Fresh ears are your best friend in the mixing process.
Arrangement and Song Structure
Let’s dive into the world of arrangement and song structure.
This is where you take all those cool sounds and ideas you’ve created and turn them into an actual song.
And let me tell you, it’s not always easy!
I’ve spent countless hours staring at my DAW, trying to figure out where the heck my track is supposed to go next.
Song Structure
First up, let’s talk about common song structures in popular music.
The classic verse-chorus-verse-chorus-bridge-chorus structure is popular for a reason – it works!
But don’t feel like you have to stick to this formula. Some of my favorite tracks break all the rules when it comes to structure.
Don’t be afraid to experiment with unconventional structures.
Some of my favorite tracks don’t even have a clear chorus! It’s all about what serves the music best.
I once made a track that was basically one long build-up with a tiny drop at the very end. Weird? Maybe. But it worked for that particular piece.
Remember, arrangement is all about flow.
You want to guide your listener through the track, keeping them engaged the whole way through.
I like to think of it like a roller coaster ride – you’ve got your climbs, your drops, your twists and turns.
It’s all about creating an experience.
Hooks and Melody
Creating hooks and memorable melodies is crucial.
This is what’s going to stick in people’s heads long after the track is over.
I remember the first time I came up with a really catchy hook – I couldn’t stop humming it for days!
Sometimes the simplest melodies are the most effective.
Don’t be afraid to strip things back and focus on a single, strong melodic idea.
Tension and Release
Building tension and release in your tracks is like telling a story.
You want to take your listeners on a journey, with ups and downs along the way.
I love using filter sweeps and risers to build tension before a drop.
And don’t underestimate the power of silence!
Sometimes, cutting everything out for a beat or two can create an incredible sense of anticipation.
Here are some techniques for creating effective intros and outros:
- Use atmospheric sounds or field recordings to set the mood
- Introduce elements of your track gradually to build interest
- Mirror your intro in your outro for a sense of completion
One mistake I used to make was trying to cram every single idea into one track.
Now, I try to focus on a few key elements and really develop them throughout the song.
It’s all about quality over quantity, you know?
Transitions
And don’t forget about transitions! These are super important for keeping your track flowing smoothly.
I love using automation to create smooth transitions between sections.
Fading elements in and out, sweeping filters, changing effects parameters – all of these can help glue your track together.
Time and Tempo
One cool technique I’ve been experimenting with lately is using different time signatures or tempos in different parts of the track.
It can create some really interesting contrasts and keep things fresh.
Just be careful not to confuse your listeners too much!
Lastly, don’t be afraid to break your own rules.
Sometimes, the best arrangements come from happy accidents or unexpected ideas.
I once accidentally duplicated a whole section of my track and ended up loving the repetition.
It became a key feature of the final arrangement!
Finalizing Your Track: Mastering Basics
Alright, let’s talk about mastering – the final frontier of music production basics.
This is where you take your mix and polish it up to sound great on any system.
Now, I’m not gonna lie, mastering is an art form in itself, and there’s a reason why professional mastering engineers exist.
But that doesn’t mean you can’t learn some basic techniques to improve your tracks!
First off, let’s talk about what mastering actually is. It’s not about making your track louder (although that’s part of it). It’s about balance, consistency, and translation.
You want your track to sound good whether it’s played on a massive club system or tinny laptop speakers.
Limiting
One of the most important tools in mastering is the limiter.
This is what’s gonna give your track that professional loudness without introducing distortion.
But be careful – it’s easy to go overboard and end up with a squashed, lifeless track.
I definitely made that mistake when I first started out. Now, I try to use limiting more subtly, just to catch the peaks and add a bit of polish.
Here’s a list of practical basics for using a limiter plugin in mastering:
- Set ceiling: Adjust the output ceiling to prevent digital clipping (usually -0.3 to -0.1 dB).
- Adjust threshold: Lower the threshold to increase loudness and compression.
- Use look-ahead: Enable to catch fast transients and prevent distortion.
- Monitor gain reduction: Aim for 1-3 dB of reduction for subtle limiting.
- Listen for distortion: Be aware of unwanted artifacts as you increase limiting.
- Compare to reference tracks: Match loudness to professional releases in your genre.
- Use true peak limiting: Prevent inter-sample peaks that could cause distortion.
- Apply dithering: If reducing bit depth (e.g., 24-bit to 16-bit), use dithering to minimize quantization noise.
EQ
EQ is another crucial tool in mastering. This is where you can make those final tweaks to the overall tonal balance of your track.
I like to use a mid-side EQ to adjust the stereo image – maybe boosting the highs on the sides for more width, or tightening up the low end in the middle.
Here’s a concise list of EQ basics specifically for mastering:
- Subtle adjustments: Use small EQ changes, typically 0.5-2 dB.
- Wide Q values: Use broader EQ curves for more natural-sounding results.
- Balance frequency spectrum: Aim for a smooth overall frequency response.
- High-pass filter: Gently remove sub-bass below 20-30 Hz to clean up the low end.
- Mid-range focus: Make small adjustments in the 200-500 Hz range to control muddiness.
- Air and presence: Subtle boosts around 10-20 kHz can add sparkle and air.
- Use linear-phase EQ: Minimizes phase issues when making broad adjustments.
- A/B testing: Frequently compare EQ changes with the unprocessed mix.
- Consider genre: Tailor your EQ choices to fit genre expectations.
- Monitor translation: Check your EQ decisions on different playback systems.
Compression
Compression is a crucial tool in the mastering engineer’s arsenal.
When applied judiciously, it can really help “glue” a mix together and give the overall sound more punch and cohesion.
The goal is to subtly even out the loudness differences between the various elements, taming the peaks without squashing the life out of the track.
It’s a delicate balance – use too much compression and you risk making things sound squashed and unnatural, but use too little and the track might lack that professional sheen.
The mastering engineer has to really dial it in, listening closely and making tiny adjustments until they get that sweet spot where the compression is working its magic but staying completely transparent.
It’s an art form unto itself, but when done right, compression can be the secret sauce that makes a good mix into a truly polished, radio-ready master.
Here’s a concise list of compression basics specifically for mastering:
- Use gentle ratios: Typically between 1.5:1 and 2:1 for subtle control.
- Slow attack times: Usually 10-50 ms to preserve transients.
- Medium to fast release: Often 50-250 ms, adjusted to the tempo of the music.
- Low threshold: Set for just 1-2 dB of gain reduction on average.
- Parallel compression: Blend in compressed signal with dry signal for more natural sound.
- Multi-band compression: Use to address specific frequency ranges independently.
- Watch for pumping: Avoid over-compression that causes noticeable volume fluctuations.
- Consider using multiple compressors: Chain 2-3 compressors with gentler settings instead of one heavy compressor.
- Pay attention to stereo image: Use M/S compression to process mid and side channels separately if needed.
- Monitor overall dynamics: Ensure you’re not overly squashing the mix’s natural dynamics.
Here are some essential tools for DIY mastering:
- A good limiter plugin
- A high-quality EQ (preferably with mid-side processing)
- A multiband compressor for controlling specific frequency ranges
- A stereo widening tool for enhancing the spatial image
Achieving loudness without sacrificing dynamics is the holy grail of mastering.
It’s all about finding that sweet spot where your track is competitive in terms of volume, but still retains its punch and impact.
I use a combination of compression, limiting, and saturation to achieve this.
And don’t forget to use reference tracks!
Compare your master to professionally mastered tracks in the same genre to see how you measure up.
One thing to keep in mind is that different streaming platforms have different loudness standards.
What sounds great on SoundCloud might be too loud for Spotify, for example.
I learned this the hard way when my first “professionally” mastered track got turned down on Spotify and lost all its punch.
Now, I always check my masters against the loudness standards for different platforms.
Remember, mastering is about subtle changes.
You’re not trying to drastically alter your mix – you’re just putting the final polish on it.
If you find yourself making big changes in the mastering stage, it might be
Music Production Basics Final Thoughts
Congratulations! You’ve just unlocked the treasure chest of music production basics.
Armed with this knowledge, you’re ready to embark on your journey to becoming the next music production sensation.
Remember, every hit song started with someone just like you, learning the ropes and experimenting with sounds.
Don’t be afraid to push boundaries and create something uniquely you. The world is waiting to hear your music!
So fire up that DAW, put on your headphones, and start crafting those beats.
Who knows? Your next track could be the one that gets the whole world dancing!
Keep learning, stay inspired, and most importantly, have fun with your music. Now go forth and create something amazing!

