Did you know that 78% of beginner pianists struggle with maintaining the correct piano hand position? It’s a fundamental aspect of playing the piano that can make or break your musical journey.
Mastering the perfect piano hand position is more crucial than ever. Whether you’re a novice or looking to refine your technique, this guide will help you unlock your full potential at the keys.
Let’s explore the art and science behind proper hand positioning and take your piano playing to new heights!
Importance of Correct Piano Hand Position
Let me tell you, getting your hand position right on the piano is no joke! I remember when I first started playing piano songs for beginners, I thought it was all about just hitting the right keys. Boy, was I wrong! It took me years to really get how crucial proper hand positioning is for nailing those tunes.
So, here’s the deal: your hand position is like the foundation of a house. If it’s wonky, everything else is gonna be off-kilter. Trust me, I learned this the hard way after developing some nasty habits early on. But once I got it right, it was like a whole new world opened up!
First off, let’s talk about how hand position affects your sound quality.
You know how some pianists make the instrument sing, while others sound like they’re just plonking away? A lot of that comes down to hand position.
When your hands are positioned correctly, you’ve got way more control over the keys. This means you can play with more nuance and expression. It’s like the difference between speaking in a monotone and using all the colors of your voice.
But it’s not just about sounding good. Proper hand position is also about efficiency.
When your hands are in the right spot, you can move faster and more accurately across the keys.
I used to tire out so quickly when I played, but once I fixed my hand position, I could practice for hours without getting as fatigued.
And let’s not forget about the long-term benefits. Good hand posture isn’t just about playing better now; it’s about protecting your hands for the future.
I’ve seen too many pianists develop repetitive strain injuries because they didn’t pay attention to their technique. Trust me, you don’t want to end up with carpal tunnel syndrome just because you couldn’t be bothered to position your hands correctly!
Here are a few key benefits of maintaining good hand posture:
- Reduced risk of injury
- Improved speed and accuracy
- Better control over dynamics and tone
- Increased stamina during practice and performance
Now, I know what you’re thinking: “But it feels so unnatural at first!” And you’re right, it does.
When I first started correcting my hand position, it felt like I was trying to play with alien appendages. But stick with it, and I promise it’ll become second nature.
One thing that really helped me was visualizing my hands as soft claws. Not like scary monster claws, but more like gentle, curved shapes that could caress the keys. This mental image helped me maintain the right shape without tensing up.
Remember, though, that everyone’s hands are different. What works for one person might not work exactly the same for another. The key is to find a position that feels comfortable and allows you to play with ease and control. Don’t be afraid to experiment a bit to find what works best for you.
In the end, getting your hand position right is all about setting yourself up for success. It might seem like a small thing, but trust me, it makes a world of difference. So take the time to get it right – your future piano-playing self will thank you!
The Anatomy of an Ideal Piano Hand Position

Alright, let’s dive into the nitty-gritty of what makes a good piano hand position.
So, let’s start with the foundation: curved fingers and relaxed wrists. This is the bread and butter of good technique, folks.
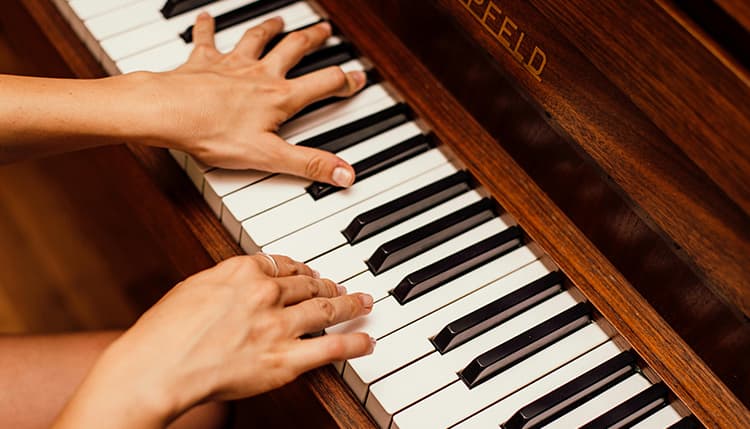
Your fingers should have a nice, natural curve to them, like you’re holding a small apple in each hand.
Now, here’s the tricky part: keeping those wrists relaxed. I can’t tell you how many times I’ve caught myself with tense wrists, especially when playing something challenging.
It’s like my hands think they’re bench pressing instead of tickling the ivories! But tense wrists are a one-way ticket to Painville, population: you. So keep ’em loose and floppy, like cooked spaghetti.
Let’s talk about the thumb for a sec. This little rebel often wants to do its own thing, hanging off the keys like it’s on vacation. But proper thumb placement is crucial for a good hand position. Your thumb should be gently curved, not locked straight, and ready to move across the keys. I like to think of it as the team captain of your fingers, always ready to lead the way.
Now, onto the rest of your upper body. Your arms, elbows, and shoulders play a bigger role than you might think. They’re like the backup dancers to your finger’s lead performance – they might not be in the spotlight, but they’re essential to the whole show.
Your elbows should float slightly away from your body, not pinned to your sides like you’re impersonating a penguin.
As for your shoulders, they should be relaxed and down, not up by your ears like you’re perpetually shrugging. I catch myself doing this sometimes when I’m really concentrating, and I have to consciously remind myself to let them drop.
Here’s a quick checklist for an ideal piano hand position:
- Fingers curved, like you’re holding a small apple
- Wrists relaxed and level with the keys
- Thumbs gently curved and ready to move
- Elbows slightly away from the body
- Shoulders relaxed and down
One thing that really helped me nail this position was practicing away from the piano. I’d sit at my desk and place my hands on the edge, mimicking the correct position. It felt silly at first, but it really helped build that muscle memory.
Remember, though, that this “ideal” position isn’t static. Your hands should be fluid and adaptable as you play. It’s not about rigidly holding one position, but about maintaining a generally good form that allows for movement and expression.
And hey, if you’re struggling with this, don’t sweat it too much. Rome wasn’t built in a day, and neither is perfect piano technique. It takes time and practice to get it right, but trust me, it’s worth the effort. Your playing will thank you, and so will your hands after those marathon practice sessions!
Just keep at it, and before you know it, you’ll be playing with hands so perfectly positioned, even Chopin would give you a thumbs up. Well, maybe not Chopin – he’s been dead for a while. But you get the idea!
Common Mistakes in Piano Hand Positioning

Oh boy, let me tell you about mistakes in piano hand positioning. I’ve seen ’em all, and I’ve made plenty myself! It’s like a greatest hits album of “Ways to Mess Up Your Hands While Playing Piano.” Let’s dive into some of these common blunders and how to avoid ’em.
First up on our hit parade: flat fingers. This is probably the most common mistake I see, especially with beginners. It’s like they’re trying to iron the keys with their fingers! I get it, it feels natural to just plop your hands down flat. But trust me, this is a one-way ticket to Sloppyville.
When your fingers are flat, you lose all that lovely control and precision that curved fingers give you. Plus, it’s a surefire way to develop tension in your hands. I remember when I first started playing, I’d practice for hours with flat fingers, wondering why my hands felt like they’d been through a meat grinder afterward.
To fix this, imagine you’re holding a small ball in each hand. This helps create that nice, natural curve in the fingers.
Next up on our tour of hand position no-nos: tension in the wrists. This is a sneaky one because it can creep up on you without you even noticing. You’re there, playing away, feeling like a regular Vladimir Horowitz, and suddenly your wrists feel like they’re made of concrete.
Tense wrists are bad news bears for a couple reasons. First, they limit your movement, making it harder to reach those tricky notes. Second, they can lead to some serious pain and even injury down the line. Nobody wants to end up with carpal tunnel syndrome just because they couldn’t loosen up their wrists!
To combat this, I like to do what I call the “jellyfish.” Between pieces or during practice breaks, let your hands dangle by your sides and shake them out, like a jellyfish floating in the ocean. It looks silly, but it works wonders for releasing tension.
Last but not least, let’s talk about overreaching and improper finger spacing. This is when you’re stretching your fingers to kingdom come trying to reach notes, or when your fingers are all bunched up like they’re huddling for warmth.
I’ve seen players spread their fingers so wide trying to reach octaves that I thought they were going to split in two! On the flip side, I’ve seen players with their fingers so close together it looked like they were trying to play one key with all five fingers.
The key here (pun intended) is to find a balance. Your fingers should be comfortably spaced, with enough room to move freely but not so much that you’re straining to reach notes. It’s all about efficiency of movement.
Here are some tips to avoid these common mistakes:
- Practice hand exercises away from the piano to build muscle memory
- Regularly check your hand position in a mirror while playing
- Take frequent breaks to shake out tension
- Use a metronome to practice slowly and focus on correct positioning
Remember, developing good hand position is a process. It takes time and consistent effort. Don’t get discouraged if you catch yourself making these mistakes – we all do it sometimes! The important thing is to be aware of them and work on correcting them.
And hey, if all else fails, just remember: your hands aren’t slices of pizza trying to lie flat on the keys, they’re not vises clamping down on the piano, and they’re not starfish trying to stretch across the entire keyboard. Keep that in mind, and you’ll be well on your way to better hand positioning!
Step-by-Step Guide to Achieving the Perfect Hand Position
Alright, folks, gather ’round! It’s time for the ultimate step-by-step guide to nailing that perfect piano hand position. I’ve been through the trenches with this one, so trust me when I say I’ve got some tricks up my sleeve that’ll have your hands looking and feeling like they belong to a pro in no time.
First things first, let’s start with some exercises off the piano. I know, I know, you’re itching to tickle those ivories, but bear with me here. These exercises are like the pushups of piano playing – not the most exciting, but boy do they pay off!
Start by making a loose fist with each hand, then slowly unfurl your fingers one by one, focusing on maintaining a curved shape. It’s like you’re doing a slow-motion jazz hands routine. I used to do this while watching TV – multitasking at its finest!
Next, practice the “spider walk” on a flat surface. Place your hand on a table, fingers curved, and lift each finger one at a time, keeping the others down. It’s harder than it sounds! I remember feeling like I was trying to pat my head and rub my tummy at the same time when I first tried this.
Once you’ve got these down, it’s time to transition to the keys. This is where things get real, people. Place your hands on the keys, making sure your wrists are level with the keys – not dipping below like you’re trying to limbo, and not raised up like you’re about to karate chop the piano.
Your fingers should be curved, remember those jazz hands? And your thumbs should be relaxed, not sticking out like you’re hitchhiking. I once had a student whose thumbs were so tense, I joked they were trying to escape from his hands!
Now, here’s a key point: your fingers should be resting on the front edge of the keys, not way back near the fallboard. Think of it like you’re gently holding onto the keys, not trying to push them through the piano.
Once you’ve got the basic position down, it’s time to practice moving around the piano keyboard while maintaining this form. Start with simple five-finger exercises, focusing on keeping your hand shape consistent as you play each note.
Here’s a practice routine I swear by:
- 5 minutes of off-piano hand exercises
- 10 minutes of slow scales, focusing on hand position
- 15 minutes of simple pieces, pausing frequently to check your form
- 5 minutes of “freestyle” playing, trying to maintain good position
Remember, consistency is key here. It’s better to practice good form for 10 minutes a day than to cram in an hour once a week with sloppy technique.
One thing that really helped me was using a mirror. I set up a small mirror next to my piano so I could glance over and check my hand position while playing. It felt a bit silly at first, like I was the vainest pianist in the world, but it made a huge difference!
Another tip: record yourself playing. You don’t need fancy equipment – your phone camera will do. Watch the video back and you might be surprised at what you see. I certainly was when I first tried this – turns out my “perfect” hand position wasn’t so perfect after all!
Now, I’m not gonna lie to you – this process can be frustrating. There were times when I felt like my hands had a mind of their own, refusing to cooperate with what my brain was telling them to do. But stick with it, and I promise it’ll become second nature.
And hey, if you’re struggling, don’t be too hard on yourself. Just keep at it, and before you know it, you’ll be playing with hands so beautifully positioned, even Beethoven would be jealous. Well, maybe not Beethoven – he had his own issues with hand position. But you get the idea!
Advanced Techniques for Optimizing Your Piano Hand Position
Alright, piano pals, it’s time to level up! We’re diving into the deep end of hand positioning, so grab your metaphorical floaties and let’s get swimming. These advanced techniques are gonna take your playing from “pretty good” to “hot diggity, that’s impressive!”
First up, let’s talk about adapting your hand position for different musical styles. This is something that took me ages to figure out. I used to play everything with the same rigid hand position, wondering why my jazz sounded stiff and my classical lacked oomph.
Here’s the deal: different styles often require subtle changes in your hand position. For instance, when playing jazz, you might want a slightly flatter finger position to get that smooth, legato sound. On the flip side, baroque music often calls for a more curved, articulated finger position for those crisp, clear notes.
I remember practicing a jazzy piece once, and my teacher told me my hands looked like they were trying to karate chop the keys. Not exactly the smooth vibe I was going for! It took some practice, but learning to adjust my hand position made a world of difference.
Now, let’s talk about incorporating hand position into your daily warm-up routine. This is crucial, folks. Your warm-up isn’t just about getting your fingers moving; it’s about setting up good habits for your entire practice session.
Start with some hand stretches before you even touch the keys. I like to do what I call the “piano prayer” – press your palms together in front of your chest, then slowly lower them while keeping your palms connected. You’ll feel a nice stretch in your wrists and forearms.
Then, move on to some keyboard exercises that focus specifically on hand position. Hanon exercises are great for this, but don’t just play them mindlessly. Really focus on maintaining that ideal hand shape as you move up and down the keys.
Here’s a quick warm-up routine I love:
- 2 minutes of hand stretches
- 5 minutes of Hanon exercises, focusing on hand position
- 3 minutes of scales, paying attention to thumb crossings
- 5 minutes of arpeggios, maintaining hand shape across wide intervals
Now, let’s get techy! There are some cool tools out there that can help you improve your hand posture. I was skeptical at first – I mean, can a gadget really help with something so personal as hand position? But let me tell you, some of these things are game-changers.
One tool I love is the hand stabilizer. It’s this nifty little device that helps maintain the proper arch in your hand. When I first tried it, it felt like my hand was in a weird exoskeleton. But after using it for a while, that ideal hand shape started to feel more natural.
There are also some great apps out there that use your phone’s camera to analyze your hand position as you play. I tried one of these and was shocked to see how much my wrists were dipping without me realizing it. Talk about a wake-up call!
But here’s the thing: while these tools can be super helpful, they’re not magic solutions. You still need to put in the work.
Conclusion
Mastering the perfect piano hand position is a journey that requires patience, practice, and perseverance.
By implementing the techniques and tips outlined in this guide, you’ll be well on your way to enhancing your piano playing skills in 2025 and beyond.
Remember, a solid foundation in hand positioning will not only improve your technique but also prevent potential injuries and elevate your musical expression.
So, keep those fingers curved, wrists relaxed, and passion high – your piano playing will thank you for it!


