Ever picked up a guitar and felt like you’re wrestling an octopus? You’re not alone!
Learning how to hold a guitar correctly is the first step towards becoming the next Jimi Hendrix or Taylor Swift.
Did you know that improper guitar holding techniques account for nearly 30% of beginner guitarists’ struggles? Don’t worry – we’ve got your back (and your hands)!
In this guide, we’ll walk you through everything you need to know about holding a guitar like a pro.
Get ready to strum your way to success!
Understanding Guitar Anatomy
To get the hang of holding a guitar, first, we’ve gotta know what’s what on this marvelous instrument. Knowing the bits and pieces not only helps us sound better but makes us look cool doing it too.
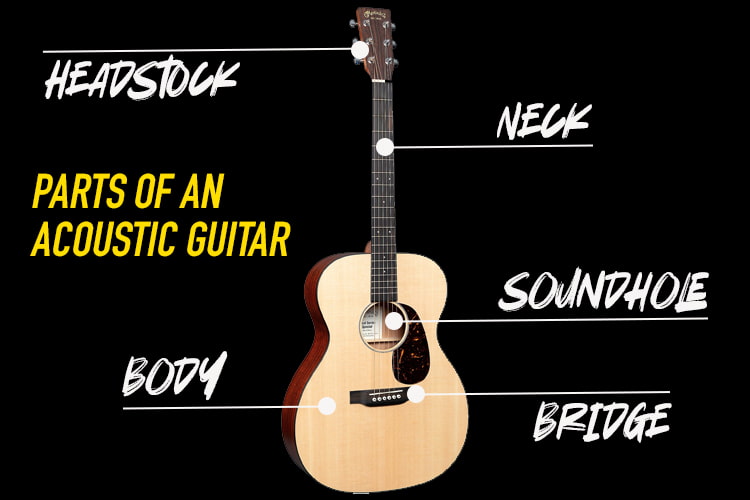
Parts of an Acoustic Guitar
Acoustic guitars are made up of several key parts, each playing its own little role in creating sound magic. Let’s take a nosy peek:
| Part | What it Does |
|---|---|
| Body | The big chunky bit that takes the twang from the strings and makes it sing. Popular shapes? Think dreadnought or concert styles. |
| Neck | The split between the headstock and body with the fretboard, frets, and the truss rod. Hold it right; it’s where your fingers do their little dances. |
| Headstock | Up top on the neck, home to the tuning pegs, and that pesky nut that decides string spacing. |
| Soundhole | The circle in the body letting sound out like a tiny amphitheater. Makes the tunes loud and proud. |
| Bridge | Keeps those strings in line and passes their vibrations straight to the heart of your guitar – the soundboard. |
Differences Between Acoustic and Electric Guitar Bodies
Both acoustic and electric guitars are stringed wonders, but their bodies come from different planets when it comes down to it.
| Thingamajig | Acoustic Guitar | Electric Guitar |
|---|---|---|
| Body Type | Big hollow space making its own music magic. | Solid chunk that needs a little help from electronics. |
| Soundhole | Yes, that’s the round bit. | Nope, but it’s all about those pickups doing the heavy lifting. |
| Material | Mostly wood – changes up the flavor of the sound. | Wood, sometimes mixed with funky synthetics for durability. |
| Bridge | Acts like a sound middleman. | Good with tone and might have a whammy bar for showing off. |
How a guitar’s built and what it’s made of can change its voice and how far its tunes will travel.
Importance of Knowing Your Instrument
When we get to know our guitar’s parts, we find it easier to work our magic. Understanding the differences makes us better players because we can:
- Fix stuff like fret buzz and avoid embarrassing moments.
- Keep our pride and joy in tip-top shape.
- Pick up the right type of axe suited for our signature style.
Proper Sitting Posture for Guitar Players
Getting comfy with your guitar isn’t just nice—it’s super important for playing like a pro. So let’s figure out the best way to sit down with our six-string friend.
Choosing the Right Chair or Stool
Pick the right throne for jam sessions! The chair should let you sit up straight and skip the arm-bending armrests. Make sure it’s at a cool height where your feet are chillin’ flat on the ground and knees are rockin’ a right angle. Too high? Too low? No bueno for your back when you’re getting into your groove.
Here’s how the seating options stack up:
| Seating Type | What’s the Deal? | Perks |
|---|---|---|
| Regular chair | Got a back but no armrest | Comfy for your extended solo moments |
| Stool | No backrest, stands tall | Teaches your back to behave |
| Special guitar chair | Made for we guitar folks | Just right for rocking out without wiggling |
Getting Your Body Comfy and Cozy
Follow these nifty steps to straighten up while shredding on your axe:
- Sit tall with a relaxed pair of shoulders.
- Feet flat, knees at that 90-degree joyride.
- Righty? Prop that guitar on your right leg. Lefty? Swap it over.
- Arm over the top of the guitar, forearm ready to strum some magic.
This setup’s all about balance and comfort—so you can focus on those killer guitar riffs.
Classical vs. Casual: The Big Decision
Compare the classical stance with the laid-back genre to see which fits you:
Classical Position:
Classical is all about support and ergonomics. Here’s the game plan:
- Get a footstool under your left foot if you’re a righty.
- Park the guitar on the left leg.
- Tilt that neck skyward for easy fretboard action.
- Sling on a strap to keep everything steady.
Casual Sitting Position:
Chill and more laid back, this style fits right into many music genres. Here’s how to do it:
- Plop the guitar on your right leg if you’re right-handed.
- Hug the guitar close to your body.
- Let the neck point just a smidge upward.
| Position Type | Classical | Casual Chill |
|---|---|---|
| Foot placement | Footstool up, left foot | Both tootsies flat |
| Guitar spot | On the left leg | On the right leg |
| Neck angle | Skyward lookin’ | A gentle tilt |
| Stability | Strap for safe-keeping | Holds on with body |
Both styles rock, and switching between them could save you from dreaded practice fatigue.
Nailing your chair choice, body posture, and finding your playing stance lets you jam with ease. Daily dedication, a pinch of patience, and believing in the process will have you strumming better than ever.
How to Hold an Acoustic Guitar While Sitting
Getting cozy with your acoustic guitar is a bit like finding that perfect lounging position on the couch—it’s all about comfort and precision. Let’s break down how to cradle that guitar while you’re parked on your seat.
Resting the Guitar on Your Leg
First things first, it’s all about where that guitar is hanging out:
- Hop on a Chair or Stool – Find a comfy chair or stool that’s got your feet nice and level with the ground. No wobbly stands that leave you doing a balancing act.
- Foot Support – If you’re needing a boost, give your foot a little lift with a footstool. This helps set a nice stage for the guitar.
- Settle the Guitar Body – Let the guitar body get snug on your thigh. You’re aiming for a gentle upward angle of the neck, so it’s all within easy reach.
Positioning the Guitar Against Your Body
It’s time to cozy up with the guitar:
- Chest Support – Hug the guitar back against your chest, giving it a snug home that won’t let it wander off mid-performance.
- Stay Connected – Keep contact going strong between your leg, chest, and your strumming arm. It’s all about that firm yet gentle grip.
- Angles Are Your Friend – Let that neck ride slightly upwards, making those frets a reachable destination without a sore wrist.
Proper Arm Placement for Strumming and Fingerpicking
Get those arms in the groove for strumming glory:
- Strumming Arm – Your elbow should chill right over the guitar body, with your hand hovering over either the soundhole or bridge. Keep that wrist free and easy to ward off stiffness.
- Fretting Hand – The fretting hand should glide naturally over the neck, thumb just chilling behind it. Stay away from mashing fingers down as they might dampen the adjacent strings—like trying to play a harp with boxing gloves.
Master the art of holding your guitar and you’ll find yourself playing with the ease of someone lounging on a hammock. Comfort leads to better tunes and less of that neck and wrist whining.
| Key Position | Description |
|---|---|
| Resting on Leg | Guitar chills on thigh, neck takes an upward hike |
| Against Body | Guitar gives you a chest hug, all secure-like |
| Strumming Arm | Elbow hangs over, wrist is chillaxing |
| Fretting Hand | Forms a comfy curve over the neck, thumb tucked behind |
How to Hold an Electric Guitar
Messin’ around with an electric guitar means getting comfy and playing like a boss. We’re gonna explore three key things: fiddling with the strap, getting that guitar to chill without making you sore, and figuring out how it’s a bit different from clunkier guitars.
Adjusting the Guitar Strap
First things first, your guitar strap is your buddy. Mess up here, and it’s all downhill. Too loose, and you’re doing a monkey dance trying to grab the neck. Too tight? Say hello to aches and awkward moves.
Let’s get it just right – think Goldilocks. The strap should hold the guitar to where your strumming hand lifelessly drapes over the strings, and your chord-playing hand finds the frets without gymnastics involved. Nail this, and you’re halfway to rock stardom without feeling like a human pretzel.
| Strap Adjustment | Effects |
|---|---|
| Way too loose | Guitar’s down by your knees. Good luck with those high notes. |
| Super tight | You’re not Houdini, so avoid the straitjacket look. |
| Just right | Everything feels just peachy. |
Balancing the Guitar’s Weight
You don’t want your guitar tipping like your least favorite aunt after the third eggnog. Let the strap do the heavy-lifting, keeping your hands free for rockin’ out. The strap should spread the load evenly so it doesn’t feel like you’re hauling a cinder block.
If you’re feeling wobbly, play around with the strap length or even how the guitar hugs your body. Some folks like it to lean a smidge forward for easier fret tango. Don’t stress, you’ll find your sweet spot with a bit of tweaking.
Differences in Posture Compared to Acoustic Guitars
Electric guitars want a little flair in how they’re held compared to the old-school acoustics.
- Standing Posture: Keep it upright, and avoid hunching like the lunch lady in a rush. Adjust the strap so it’s snug, but not clingy, and let your arms move freely without feeling restrained.
- Sitting Posture: Sit down with your electric like an aficionado or relax in a way that feels right. Classical, where the axe sits on your left leg (if you’re righty), can make things smooth as butter. Keep that spine straight and proud.
- Stability and Grip: Electric guitars are the slimmer cousins in the family, so you might notice a difference in weight and feel. Make sure it’s secure and doesn’t flail around like a fish out of water while you strum away.
Master these tricks, and your electric guitar won’t feel like a puzzle anymore. Just you and the music, groovin’ smooth.
Hand Placement on the Guitar Neck
Getting your hands just right on the guitar? That’s key for comfy playing, smoother tunes, and sounding like a rockstar. Let’s swap stories about getting that fretting hand and thumb to work their magic, and some common trip-ups to dodge.
Positioning Your Fretting Hand
Your fretting hand’s all about style and substance. Here’s the lowdown:
- Rock those fingertips! Keeping them close to the frets but not smothering them gets you that clean, clear twang. A rookie slip-up? Fingers too far back, which means you gotta press like Hercules just to sound a note.
- Point those fingers. It’s all in the tips, not the pads. Nailing it this way keeps neighboring strings from getting unintentionally muted and keeps your strumming crisp.
| Blunder Bus | Sweet Spot |
|---|---|
| Fingers hanging back from frets | Fingers cozy with the frets |
| Fat finger action | Pointed finger finesse |
Thumb Placement for Optimal Reach
Your thumb’s the backstage crew, supporting the action up front. Here’s how to keep it happy:
- Let your thumb relax behind the neck around the mid-point, applying just enough pressure. This strategy lets your fingers curve smoothly, making those intricate chords and funky riffs seem simple.
- Don’t go thumb-hugging the neck! That cramped grip stops your fingers from dancing up and down the strings the way they should.
Common Mistakes to Avoid When Gripping the Neck
Keep these blues at bay by steering clear of these no-nos:
- Hunching Over: Stand or sit tall! Let those shoulders chill out. Staying loose helps you jam longer without the ouch-factor setting in.
- Death-Grip Syndrome: Going ape on the neck leads to sore mitts and tired arms. Easing off helps your fingers fly over the frets smoothly and keeps your play flexible.
- Wonky Elbow: Let your elbow breathe a bit away from your body. It gives your arm freedom to roam and keeps your playing tension-free.
With these tweaks and tons of practice, we’re set for a more fab and comfy jamming experience. Want a quick check of your pose? A mirror’s your next-gig best friend for spotting slip-ups. Let’s keep strumming and steal the show with these basic but killer tips!
Strumming Hand Techniques
Nailin’ your strumming hand game is the secret sauce for strummin’ that guitar like a pro while keeping it comfy. Whether you’re pickin’ up a pick or going full-on finger ninja, gettin’ your hand techniques down will really amp up your jammin’ game.
Proper Wrist Alignment for Strumming
When you’re swingin’ that strumming arm, keeping your wrist in check is key—prevents that nasty tension and makes playin’ a breeze.
- Keep it straight, but keep it chill—no robot arms here.
- Shoulders, arms, hands—relax ’em or pay the price later.
- Let your hand hover over the strings, swaying like a lazy Sunday from your wrist, not your elbow.
Fingerpicking Hand Position
Gettin’ into fingerpicking? It’s all about hand vibe and finger flair. Here’s your cheat sheet:
- Rest that palm just so on the guitar bridge—nice and steady.
- Fingers: slightly bent, relaxed, like they’re nap-ready.
- Thumb’s got bass duty (E, A, D), while fingers tackle the higher plane (G, B, high E).
- Let ’em groove independently, plucking with the fingertip like it’s ticklin’ ivory.
Using a Pick vs. Fingerstyle Playing
Wanna rock out with a pick or go au naturel with fingerstyle? Each has its perks and it’s all about your jam preference.
Using a Pick
- Gives that punchy sound that cuts through.
- Top choice for breakneck strumming or hitting single notes like a gun slinger.
- Cradle that pick between thumb and index—hold like a firm handshake, not a vice grip.
- Light grip avoids the death clutch and hand fatigue.
| Technique | Advantages | Best For |
|---|---|---|
| Using a Pick | Bold, clear sound | Speed strumming, solos |
Fingerstyle Playing
- Delivers a smooth, delicate tone.
- Best for complex finger dances and string finesse.
- Thumb or fingers make a warm melody with a gentle touch.
- Perfect for classical, folk vibes, and really fancy finger work.
| Technique | Advantages | Best For |
|---|---|---|
| Fingerstyle | Soft, intricate sound | Classical, folk, precise picking |
Gettin’ these strumming hand techniques down pat makes rippin’ tunes an absolute joyride. Wrist right, hand positioned, and choosing between pick or fingerstyle can crank up our guitar shindig and make it as fun as a Saturday night jam session. Let’s make that six-string come alive!
How to Hold a Guitar Standing
You know, standing with a guitar can be just as comfy and effective as sitting if we get our posture and gear right. Let’s break down how to hold that axe while standing so you’re comfy and sounding top-notch.
Getting Your Guitar Strap Right for Standing
Alright, numero uno: the strap! If it’s hanging too low, you’ll be reaching like a giraffe to get a hold of those strings. To fix it, tighten the strap so your guitar sits at a decent level for easy fretting and strumming. Just imagine it resting comfortably around your midsection, not too tight and not hanging loose like a noodle.
| Strap Tips | What’s Up |
|---|---|
| Tone Level | Sit that guitar mid-torso for easy jam |
| Snug Fit | Keep it stable but comfy, no need for a vice grip |
| Stay Balanced | Make sure it doesn’t lean and get all wonky |
A properly adjusted strap frees your hands, adding stability and consistency to your strumming adventures.
Keeping Steady and Chill While Standing
Balance and stability are like peanut butter and jelly when you’re on your feet. Standing straight—without the leaning tower of Pisa effect—helps keep the backaches at bay during those marathon jam sessions.
To keep your cool pose:
- Plant those feet shoulder-width apart.
- Spread your weight evenly—no favoring one leg too much.
- Keep your back straight and shoulders nice and mellow.
Tilting your guitar slightly up can also help with comfort, letting you strum and pick with ease.
From Chair to Rockstar Mode
Switching between sitting and standing with your guitar is simple once you get the hang of it. Check out how easy it can be:
- Pause and Protect: Stop your playing momentarily to make sure your strap is secure.
- Slowly Rise: Glide smoothly into standing while hugging your guitar to your chest.
- Fine-tune Strap On-the-Fly: Once upright, see if your guitar needs any tweaking to keep you comfy.
With some practice, changing from sitting to standing becomes second nature, making you ready to play anywhere without awkward adjustments.
Mistakes When Holding a Guitar
Playing the guitar is like trying to balance on a one-foot chair while juggling flaming batons; it’s an art that takes practice and, oh boy, do we make some classic mistakes along the way. Let’s chat about a few missteps folks make when handling a guitar and, more importantly, how to sidestep them for buttery-smooth performances.
Playing the Shrimp: Staying Bent Over
One big mistake—becoming the bent-over shrimp munching on your own fingers! Slouching over your guitar gives you a one-way ticket to Back Pain Central, with a layover at Aching Hands International. Here’s the deal to keep that spine straight and feeling fine:
- Sit like royalty. Snag a chair with decent back support. Your future chiropractor will thank you.
- Cuddle the guitar (but not too much). Prop that guitar on your leg so it’s snug against you, but keep your back from rounding.
- Give your foot a boost. A footstool under one foot can keep you sitting like a champ, especially when you’re going all classical on us.
Death Grip on the Guitar Neck
Ever feel like you’re clutching the guitar neck for dear life? It’s not falling off the Titanic! Tensing up creates more problems – it might even make hitting those chords feel like arm wrestling a bear. So let’s loosen up, alright?
- Barely hold it. Gently caress the neck with just enough touch to sound those notes cleanly. No need to press like you’re trying to juice an orange.
- Thumbs up! Keep your thumb chillin’ at the rear of the neck, not choking it. Think gentle, like petting a kitten.
- Spot-on fingers. Aim your fingers right on those frets, and the rest will follow. Precision beats force every time.
The Wayward Elbow
Now let’s talk elbows—they can knock you off your game if they’re cocked wrong. The secret’s in the swing:
- Fretting hand elbow: Give it some space from your body. Your fingers need to run free across the fretboard like a squirrel on a power line.
- Strumming hand action: Stay loose, let your strumming elbow do a little happy dance. A relaxed wrist is your secret weapon for smooth strumming and fingerpicking.
| Mistake | Why It’s Trouble | How to Fix That |
|---|---|---|
| Hunching over the guitar | Hurts your back, hands, and causes finger tension | Sit straight, pick a good chair, elevate those feet |
| Gripping the neck too hard | Tensions up muscles and makes playing a chore | Loosen that grip, proper thumb spot, precise finger aim |
| Messed-up elbow position | Messes with your technique, invites undue soreness | Keep elbow space for fret hand, chill-out strumming elbow |
Keeping these blunders in check means more fun and fewer aches on the guitar-playing odyssey. The more we practice good posture and technique now, the more our bodies will thank us later. Trust us—your back, hands, and musical mojo will all thank you big time!
Practice Exercises for Proper Guitar Holding
So, we’re on a mission to build some solid habits and keep it cozy while strumming those strings, right? Let’s sprinkle in some practice exercises to nail that perfect guitar-holding mojo. Here’s our game plan to master cradling the six-string like pros.
Mirror Technique for Self-Correction
Grab that mirror, folks—it’s not just for selfies! Set yourself up with a big ol’ mirror in your practice zone. With this setup, you’ll keep tabs on your form. Here’s how to get it right:
- Check Your Back and Shoulders: Keep that back straight and easy-going, no slumping over like a sack of potatoes.
- Leg and Foot Placement: Elevate your guitar-supporting leg; maybe a footstool’s your best friend here.
- Guitar Positioning: Got the guitar sitting snug on your thigh? Keep it close to the bod.
- Arm and Hand Position: Watch those arms—they’re your rock stars. Upper right arm chilling on top, while your forearm swings freely to strum away.
Exercises to Improve Hand Strength and Flexibility
Getting a grip, quite literally, is the name of the game. These exercises will have our fingers dancing across the frets like it’s nobody’s business:
| Exercise | What You Do |
|---|---|
| Finger Stretching | Hand flat on a table, press down gently, let the fingers fan out. |
| Squeeze Ball | Grab a squishy ball, squeeze-release, repeat. Strength game strong! |
| Spider Walk | Creepy crawly up and down the neck, fingers only. |
| Grip Trainers | Squeeze with purpose using grip gadgets to boost finger and hand power. |
Incorporating Proper Holding into Your Practice Routine
Routine’s our buddy here. It’s all about making those good habits stick, turning the nitty gritty into second nature:
- Warm-Up Routine: Kick things off by double-checking posture and hand position with that trusty mirror.
- Breathing Exercises: Inhale, exhale—chill out and keep the stamina rolling while you jam.
- Regular Breaks: Mini time-outs every 30, shake off any tension and come back fresh.
- Mindful Practice: Feel that guitar, feel those vibes, let your body groove naturally.
| Exercise | How Often | How Long |
|---|---|---|
| Warm-Up Routine | Start of each jam session | 5 minutes |
| Breathing Exercises | Before letting loose | 2 minutes |
| Regular Breaks | Every half-hour | 5 minutes |
| Mindful Practice | While rocking out | Ongoing |
With these exercises and tips in our toolkit, we’re all set to keep that playing posture on point, ensuring our six-string sessions are comfy and groovy. We’re talking a guitar experience without the ouch—just sweet, sweet music.
Congratulations! You now know how to hold a guitar like a true rockstar.
Remember, mastering proper technique takes time and practice, but it’s the foundation for everything you’ll play.
Whether you’re strumming chords or shredding solos, keeping these tips in mind will help you play comfortably and avoid unnecessary strain.
So, what are you waiting for? Grab your guitar, apply these techniques, and let the music flow!
Who knows? With the right hold, you might just be the next guitar hero in the making.
Keep practicing, and don’t forget to have fun along the way!


