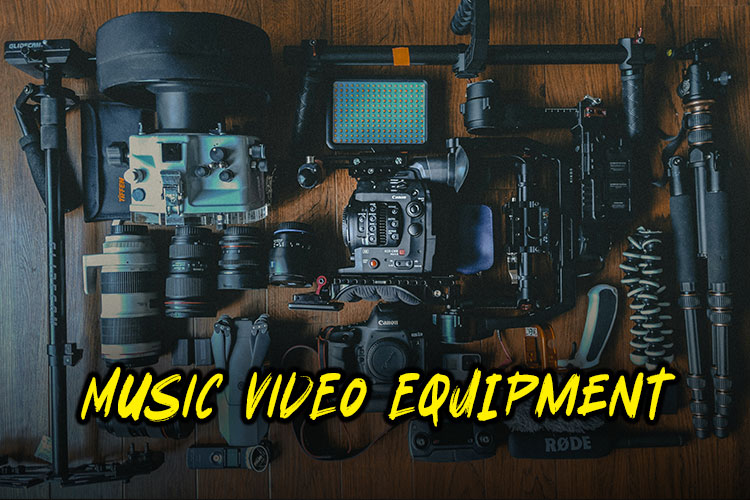
The visual aspect of music is more important than ever! Whether you’re an aspiring artist or a seasoned pro, having the right music video equipment can make or break your production.
In this guide, we’ll dive into the essential gear you need to create jaw-dropping music videos that’ll have your fans hitting replay again and again. Let’s get this show on the road!
Cameras: The Heart of Your Music Video Equipment
Let me tell you, when it comes to making music videos, the camera is your best friend – or worst enemy if you don’t know what you’re doing!
I learned that the hard way when I first started out.
Picture this: me, thinking I could shoot an entire video on my old flip phone. Yeah, that didn’t turn out so great.
These days, I swear by my DSLR. It’s a game-changer, folks. The quality is just unbeatable for the price.
But hey, if you’re just starting out or on a tight budget, don’t sweat it. The cost of a music video doesn’t have to break the bank. Your smartphone can work wonders too.
I’ve seen some killer videos shot entirely on iPhones.
Resolution
Now, let’s talk about resolution. 4K is pretty much the standard now, but 8K is creeping in.
Do you need 8K? Honestly, for most people, 4K is plenty.
But if you wanna future-proof your content, 8K might be worth considering.
Just be prepared for those massive file sizes!
Versatility
One thing I’ve learned over the years is that versatility is key.
That’s why I always keep an action camera in my kit.
You never know when you’ll want to get that crazy shot from inside a drum or strapped to a guitarist’s headstock.
Trust me, it’s happened!
Here are a few tips I’ve picked up along the way:
- Invest in a good camera body, but don’t neglect lenses (more on that later)
- Always shoot in the highest quality your camera allows – you can always downscale later
- Learn your camera’s quirks and features – each one has its own personality
- Don’t be afraid to experiment with different shooting styles
Remember, at the end of the day, it’s not about having the fanciest gear. It’s about knowing how to use what you’ve got.
I’ve seen mind-blowing videos shot on budget setups, and I’ve seen boring videos shot on top-of-the-line equipment.
It’s all about your creativity and vision!
Check out this article i did on some of the best cameras for music videos. This will give you a good idea of where to start.
Lenses for Music Videos
Alright, let’s rap about lenses.
Man, when I first started out, I thought all lenses were basically the same.
Boy, was I wrong! Each type of lens can completely change the feel of your shot. It’s like magic, I swear.
Wide Angles Lenses
First up, we’ve got wide-angle lenses. These babies are perfect for those epic band shots where you wanna capture the whole stage.
I remember using one for a local punk band’s video – it made their tiny garage look like a massive concert hall.
Talk about setting the mood!
Prime Lenses
Now, if you’re going for that cinematic look, prime lenses are your best friend.
They’ve got this amazing ability to create a shallow depth of field.
You know those shots where the artist is in crisp focus and the background is all blurry and dreamy?
That’s the magic of a good prime lens.
Zoom Lenses
Zoom lenses are like the Swiss Army knives of the lens world.
They’re super versatile, which is great when you’re shooting in unpredictable situations.
Being able to quickly switch from wide shots to close-ups without changing lenses was a lifesaver.
Specialty Lenses
But let’s talk about the fun stuff – specialty lenses.
Fisheye lenses can create some wild, distorted effects that are perfect for certain genres.
And don’t even get me started on tilt-shift lenses. They can make your scene look like a miniature model. It’s trippy as hell!
Here are some lens tips I’ve learned (sometimes the hard way):
- Invest in quality lenses – they often outlast camera bodies
- Rent before you buy – lenses are expensive, make sure you love it first
- Learn to change lenses quickly and safely – you don’t wanna miss a shot
- Always, ALWAYS use lens caps when not shooting
One last thing – don’t be afraid to get creative with your lens choices.
Some of the coolest shots I’ve ever gotten were from using lenses in unconventional ways.
Like the time I used a macro lens to get extreme close-ups of a guitarist’s fingers during a solo.
It added this whole new dimension to the video.
Remember, lenses are tools, but you’re the artist.
Don’t let anyone tell you there’s a “right” way to use them.
Experiment, have fun, and create your own style!
Lighting Music Video Equipment
Lighting, oh lighting. It’s the unsung hero of video production, I tell ya.
I can’t count the number of times good lighting has saved my bacon on a shoot.
And let me tell you, I’ve had my fair share of lighting disasters too.
Like that time I thought I could light an entire warehouse with a single desk lamp. Spoiler alert: it didn’t work out.
LED Lights
These days, LED panel lights are my go-to. They’re consistent, adjustable, and don’t heat up like the old-school lights used to.
Plus, they’re way more energy-efficient. Win-win, right?
I remember the first time I used them on a shoot – it was like stepping into the future.
No more burned fingers from adjusting hot lights!
Ring Lights
Now, let’s talk about ring lights. These circular beauties are perfect for those up-close and personal shots.
They create this gorgeous, even light that’s super flattering.
I use them all the time for music video interviews or beauty shots of the artists.
Just be careful not to overdo it – nobody wants to look like they’re auditioning for a sci-fi flick!
One of my favorite tricks is using colored gels and filters. They can completely transform the mood of a scene.
I once worked on a video for an electronic artist where we used blue gels to create this cool, futuristic vibe.
It looked amazing, and the artist was over the moon.
Portable Lighting Kits
Portable lighting kits are a lifesaver for on-location shoots.
I learned this the hard way after years of lugging my entire studio setup to a video shoots. Never again!
Now I’ve got a compact kit that fits in a backpack. It’s been a game-changer for those spontaneous outdoor shoots.
Here are some lighting tips I’ve picked up over the years:
- Always have a backup power source for your lights
- Learn the basics of three-point lighting – it’ll save your life
- Don’t be afraid of shadows – they can add depth and drama
- Experiment with practical lights (lamps, car headlights, etc.) for unique effects
One last thing – lighting isn’t just about making things visible. It’s about creating a mood, telling a story.
I once shot a test video where we used only candlelight. It was a nightmare to expose properly, but man, the result was gorgeous.
It perfectly captured the intimate, acoustic vibe of the song.
Remember, good lighting can elevate a simple video to a work of art.
But bad lighting? It can make even the most expensive production look cheap.
So take the time to get it right!
Audio Equipment for Music Videos
Alright, let’s get real about audio. I don’t care how pretty your video looks – if the sound sucks, you’re toast.
Trust me, I learned this the hard way.
I once spent days shooting this incredible video, only to realize later that all my audio was distorted.
Talk about a facepalm moment!
Microphones
First things first: microphones. They’re the unsung heroes of music videos.
For live performances, I swear by my trusty dynamic mics. They’re sturdy, reliable, and great at rejecting background noise.
But for those intimate acoustic sessions? Nothing beats a good condenser mic. The clarity is just chef’s kiss.
Audio Interface
Now, let’s chat about audio interfaces. These little boxes are lifesavers when you’re recording instruments or vocals directly.
I remember the first time I used one – it was like hearing my guitar for the first time all over again.
The sound was so crisp and clean, I couldn’t believe it.
Recorders
Portable recorders are another must-have in my kit.
They’re perfect for capturing those ambient sounds that can really bring a video to life.
I once used one to record the sounds of waves for a beachside music video.
It added this whole extra layer of atmosphere that really elevated the final product.
Headphones
And don’t even get me started on headphones. A good pair of monitoring headphones is worth their weight in gold.
They let you catch those little audio issues that might slip by otherwise. I always keep a spare pair in my bag, just in case.
Here are some audio tips I’ve picked up over the years:
- Always do a sound check before you start shooting
- Use windscreens on your mics when shooting outdoors
- Record room tone at every location – it’s a lifesaver in post-production
- Don’t be afraid to get creative with your audio – sometimes “mistakes” can lead to cool effects
One last thing – remember that audio isn’t just about the music. It’s about creating a complete sonic environment.
I once shot a video in a busy city, and we decided to incorporate the street sounds into the track.
It ended up giving the whole video this amazing, urban vibe.
Bottom line: treat your audio with as much care as your visuals. Your viewers’ ears will thank you!
Stabilization Music Video Equipment
Let’s talk about keeping things steady, shall we?
Cause let me tell you, shaky footage is the fastest way to make your music video look amateurish.
I learned this the hard way when I first started out. I thought I could just handhold my camera for an entire shoot.
Spoiler alert: I couldn’t. The result looked like it was shot during an earthquake!
Tripods
These days, tripods are my best friends. They’re perfect for those locked-down shots that just scream ‘professional’.
I remember the first time I used a really good tripod – it was like my camera was floating on air.
No more micro-jitters or subtle movements. Just pure, rock-solid stability.
Gimbals
But what about when you want some movement in your shots? That’s where gimbals come in.
These things are like magic wands for videographers. They let you move your camera around smoothly, almost like it’s floating.
I once used a gimbal to follow a singer as they walked through a crowded street.
The footage was so smooth, it looked like we’d used a dolly track!
Looking for some of the best gimbals for music video production
Steadicams
Now, if you really wanna get fancy, there’s always the Steadicam.
These bad boys are what the pros use in Hollywood, and let me tell you, they’re not easy to master.
I spent weeks practicing with one before I felt confident enough to use it on a shoot.
But once you get the hang of it? Man, the results are incredible.
Rails
For those slow, smooth tracking shots, slider rails are your best bet.
They’re great for adding some subtle movement to otherwise static scenes.
I love using them for instrument close-ups during solos. It adds this great sense of momentum to the shot.
Here are some stabilization tips I’ve picked up:
- Always balance your camera properly on your stabilization tool
- Practice, practice, practice – especially with gimbals and Steadicams
- Don’t overdo it with movement – sometimes a static shot is best
- Invest in a good quick-release system for switching between stabilizers quickly
One last thing – remember that sometimes a little shake can be good.
Sometimes you might want to deliberately used handheld shots and get some shaking to capture the raw energy of the performance.
It’s all about matching your shooting style to the vibe of the music.
Bottom line: smooth shots can make your video look super professional, but don’t be afraid to shake things up (literally) if it fits the mood!
Check out this article on some of the best camera stabilizers for music videos if your ready to take the dive.
Post-Production Music Video Equipment
Alright, let’s dive into the world of post-production. This is where the magic really happens, folks.
It’s like alchemy – you take all these raw ingredients and turn them into gold. Or at least, that’s the idea.
I’ve definitely had my share of lead along the way!
Computers
First things first: you’re gonna need a beast of a computer. Trust me on this one.
I learned the hard way when I tried to edit my first 4K video on my old laptop. It was like watching paint dry, except less exciting.
These days, I’ve got a souped-up Mac Studio that chews through footage like it’s nothing. It’s a game-changer, I’m telling ya.
Software
Now, let’s talk software. Adobe Premiere Pro has been my go-to for years. It’s like an old friend at this point – temperamental sometimes, but I know all its quirks.
Final Cut Pro is another solid choice, especially if you’re in the Apple ecosystem.
Pro Tip: Whatever music video editing software you choose, learn it inside and out. I once lost a whole day’s work because I didn’t know about auto-save. Never again!
Color Grading
Color grading is where you can really make your video pop. It’s like putting a filter on your Instagram pic, but way more powerful.
I remember the first time I really nailed a color grade – it was like seeing my footage with new eyes.
Suddenly, everything looked cinematic and professional. It’s addictive, I warn ya!
Storage
One thing you can never have too much of? Storage. External hard drives are a must-have.
Video files are huge, especially if you’re shooting in 4K or higher.
I’ve got a whole shelf of hard drives, each labeled meticulously. It’s not sexy, but it’s saved my bacon more times than I can count.
Here are some post-production tips I’ve picked up:
- Always, ALWAYS back up your files
- Take regular breaks to rest your eyes and brain
- Don’t be afraid to try wild effects – you can always undo them
- Get feedback from others – fresh eyes can spot things you’ve missed
One last thing – remember that post-production is where your creative vision really comes to life.
Don’t be afraid to experiment and try new things.
I once spent hours creating a weird, glitchy effect for a video. It was a pain in the butt, but the result was so cool it was totally worth it.
At the end of the day, post-production is where you turn your raw footage into a polished masterpiece.
It’s hard work, but man, when you export that final video and everything comes together perfectly?
There’s no better feeling in the world!
Conclusion
And that’s a wrap, folks!
With this arsenal of music video equipment at your disposal, you’re ready to create visuals that’ll make your music shine brighter than a supernova.
Remember, while having the right gear is crucial, it’s your creativity and passion that’ll truly make your music videos stand out.
So, grab your camera, hit record, and let your imagination run wild!
Who knows? Your next music video might just be the one that breaks the internet.
Now go out there and make some visual magic happen!

