Are you ready to take your music production skills to the next level?
Compression is the secret sauce that can make or break your mix, but it’s often misunderstood and misuse.
Beginners just learning how to mix music often struggle with audio compression, but don’t worry – we’ve got you covered.
In this guide, we’ll dive into 5 essential audio compressor tips that’ll have you mixing like a pro in no time.
Let’s get that perfect punch and clarity in your tracks!
Basics of Audio Compression
Let me tell ya, when I first started messing around with audio compression, I was totally lost.
I mean, what even is this weird knob-twiddling magic? But trust me, once you get it, it’s a game-changer for your mixes.
So, audio compression is basically like a volume control on steroids.
It squashes down the loud parts of your audio and brings up the quiet bits.
Why’s that important? Well, it helps even things out and gives your tracks more consistency and punch.
I remember the first time I properly compressed a vocal – it was like night and day!
Suddenly, every word was clear and upfront in the mix.
Now, there are a few key parameters you gotta wrap your head around.
Audio Compressor Threshold
First up is the threshold. This is like the bouncer at a club – it decides when the compression kicks in.
Set it too high, and nothing happens. Too low, and you’ll squash the life outta your audio.
Audio Compressor Ratio
Then there’s the ratio. This bad boy determines how hard you’re squeezing your signal.
A 2:1 ratio is like a gentle hug, while 10:1 is more like a bear squeeze.
I learned the hard way that more isn’t always better – I once compressed a snare drum at 20:1 and it sounded like a sad cardboard box. 😅
Audio Compressor Attack & Release
Attack and release times are tricky little devils.
They control how fast the audio compressor reacts and lets go.
Get ’em wrong, and you can end up with all sorts of weirdness.
I once set a super-fast attack on a bass guitar and wondered why it lost all its punch. Rookie mistake!
Hardware vs. Software Audio Compressor
Now, here’s where it gets interesting – hardware vs. software audio compressors.
Back in the day, hardware was king, but now? Plugins have come so far, it’s insane.
I’ve got some fancy hardware units gathering dust ’cause the in-the-box stuff is just so good and convenient.
But here’s the thing – whether you’re using hardware or software, the principles are the same.
It’s all about understanding how these parameters interact and affect your sound. And lemme tell ya, that takes practice. Lots of it.
I remember spending hours just compressing and uncompressing the same drum loop, trying to hear the differences.
Was I going mad? Probably. But it paid off in the long run.
Now I can dial in an audio compressor pretty quickly, and I know exactly what I’m listening for.
One last thing – don’t get too hung up on the numbers. Use your ears!
I’ve seen folks obsess over getting the “perfect” settings, but at the end of the day, if it sounds good, it is good. Trust your gut and your ears.
So there you have it – compression in a nutshell. It’s a powerful tool, but like any power tool, you gotta learn how to use it safely.
Otherwise, you might end up chopping off your audio’s metaphorical fingers. And nobody wants that, right?
Audio Compression Graph
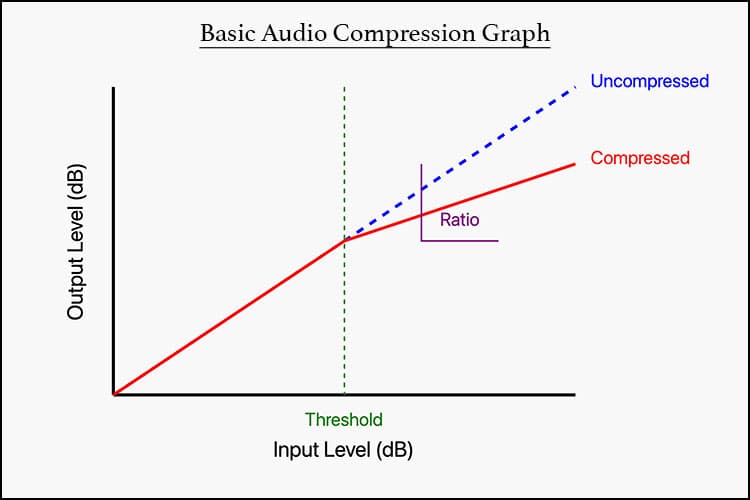
Above is a simple graph illustrating the basics of audio compression.
Here’s an explanation of the key elements:
- The x-axis represents the input level in decibels (dB), while the y-axis represents the output level in dB.
- The blue dashed line shows the uncompressed signal, where input equals output.
- The red line represents the compressed signal:
- Below the threshold, it follows the uncompressed line.
- Above the threshold, it has a reduced slope, showing compression.
- The green vertical dashed line indicates the threshold level, where compression begins to be applied.
- The purple lines and text illustrate the compression ratio, showing how the output level changes less than the input level above the threshold.
This audio compressor graph visually demonstrates how compression reduces the dynamic range of a signal above the threshold, while leaving the signal unchanged below the threshold.
The steepness of the compressed line above the threshold represents the compression ratio.
1. Choose the Right Audio Compressor
Alright, let’s talk about picking the right audio compressor.
It’s like choosing the right tool for a DIY project – use a hammer when you need a screwdriver, and you’re in for a world of hurt.
Types of Audio Compressors
First up, we’ve got different types of audio compressors.
There’s VCA (Voltage Controlled Amplifier), FET (Field Effect Transistor), optical, and more.
Each has its own flavor, kinda like ice cream. And just like ice cream, sometimes you want vanilla, sometimes you want rocky road.
VCA Audio Compressor

VCA audio compressors are like the Swiss Army knife of compression. They’re clean, precise, and great for a wide range of sources. I use ’em all the time on drums and vocals.
FET Audio Compressor

FET audio compressors, on the other hand, are known for their fast attack times and can add a nice color to your sound. They’re awesome for adding punch to drums or grit to a bass.
Optical Audio Compressor

Optical audio compressors are slower and smoother. They’re great for smoothing out vocals or adding sustain to guitars.
I once used an optical audio compressor on an acoustic guitar track, and it was like butter – so smooth and musical.
Now, matching the right audio compressor to your audio source is crucial.
It’s like pairing wine with food – get it right, and it’s magic.
Get it wrong, and… well, let’s just say I once used a super aggressive FET audio compressor on a delicate piano piece.
It sounded like the piano was being attacked by an angry robot. Not my finest moment.
Popular Audio Compressor Plugins
When it comes to popular audio compressor plugins, there are tons out there.
- The 1176 emulations are great for adding character and punch.
Waves 1176 Style Audio Compressor Plugin - The LA-2A style compressors are fantastic for smooth, musical compression on vocals and bass.
Waves LA-2A Style Audio Compressor Plugin - And don’t get me started on the SSL G-Bus compressor – that thing is a mix glue magician and works great when mastering your song!
Waves SSL-G Master Buss Compressor Plugin
But here’s the thing – don’t just stick to one audio compressor for everything. Experiment!
I used to always reach for the same plugin, but when I started branching out, I discovered so many new sounds and possibilities.
One time, I was working on a rock track and I was having a hard time mixing drums so they would sit right.
I tried my go-to compressors, but nothing was working.
Then, on a whim, I tried this weird, obscure compressor plugin I’d downloaded ages ago.
Boom! Instant magic. The drums suddenly had this awesome, gritty character that fit the track perfectly.
Remember, though, that the best compressor is the one that sounds right for your track.
Don’t get too caught up in the hype or what some guru says is the “best” compressor. Trust your ears and go with what works for you.
And hey, don’t be afraid to stack different compressors!
Sometimes I’ll use a clean VCA for general leveling, then follow it up with a colorful FET for some extra character. It’s like layering flavors in cooking – when you get it right, it’s chef’s kiss.
Lastly, take the time to really learn your compressors. Each one has its quirks and sweet spots.
I spent a whole weekend once just putting different sources through my favorite compressor plugin, tweaking settings and listening to the results.
Was it a bit nerdy? Sure. But it made me so much faster and more confident when mixing.
So there you have it – choosing the right compressor is an art and a science.
It takes practice, but once you get the hang of it, you’ll be shaping your audio like a pro in no time!
2. Set the Perfect Audio Compressor Threshold
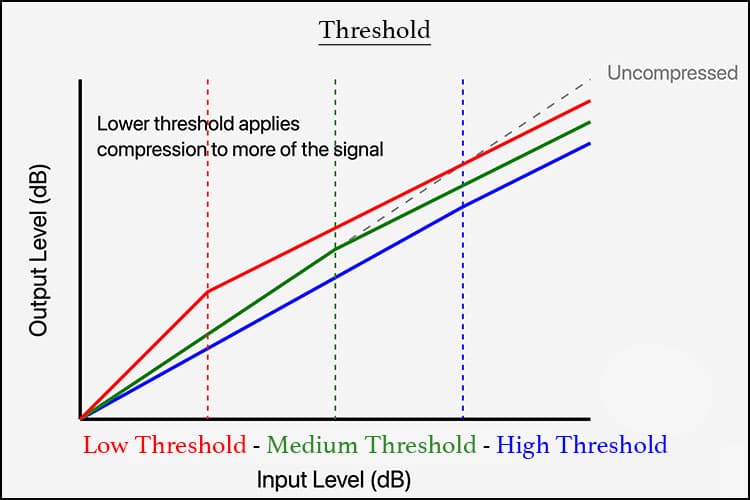
Setting the right threshold is like finding the sweet spot on a trampoline – too high and you won’t bounce, too low and you’ll bottom out. It’s all about balance, folks!
When I was learning how to produce music, I used to just eyeball the threshold, and let me tell you, that led to some… interesting results.
I once set the threshold so low on a vocal track that it sounded like the singer was being slowly strangled.
Not exactly the vibe we were going for!
So, how do you find that Goldilocks zone for your threshold?
First things first, you gotta know your source material. Is it a dynamic vocal with lots of quiet and loud parts? Or a more consistent bass line? This’ll give you a starting point.
One trick I learned is to start with the threshold way too low, so everything’s getting squashed.
Then, slowly bring it up until you start hearing the natural dynamics come back.
It’s like letting a spring gradually uncoil – you can really hear when it starts to breathe again.
Now, here’s where those fancy gain reduction meters come in handy.
These visual aids are like x-ray vision for your compression.
I aim for about 3-6 dB of gain reduction on average for most sources.
But remember, there’s no hard and fast rule here. Sometimes you might want more, sometimes less.
I remember working on this pop track where the producer wanted the vocals to be super in-your-face.
We ended up with like 10-12 dB of gain reduction, which would usually be way too much. But in this case? It was exactly what the track needed.
The moral of the story? Rules are made to be broken, kids!
The impact of threshold on your overall sound can’t be overstated.
Set it too high, and you might as well not be using compression at all. Too low, and you’ll suck all the life out of your audio. It’s a delicate balance.
Here’s a little secret: sometimes, I’ll actually automate the threshold. Yeah, you heard me right!
For example, on a vocal track, I might set a higher threshold for the verses and lower it for the chorus.
This way, I can get more compression when I need it, without squashing the quieter parts. It’s a game-changer, trust me.
Another thing to keep in mind is that different genres often call for different threshold approaches.
In EDM, you might be going for some pretty heavy compression, so lower thresholds are common.
In jazz or classical? You’ll probably want to be more conservative to preserve those natural dynamics.
Oh, and here’s a rookie mistake I made way too many times: forgetting to check my threshold after making other changes to the mix.
You tweak some EQ, adjust some levels, and suddenly your carefully set threshold is way off. Always double-check!
Remember, setting the threshold isn’t a “set it and forget it” kinda deal.
It’s more like tuning a guitar – you gotta keep checking and adjusting as your mix evolves.
But with practice, you’ll develop an intuition for it. You’ll start to hear when the threshold is just right.
And hey, don’t be afraid to use your eyes and your ears. Those meters are helpful, but at the end of the day, if it sounds good, it is good. Even if the meter is telling you you’re doing it “wrong”.
So there you have it – the art of setting the perfect threshold. It might take some trial and error, but once you get it, you’ll be controlling your dynamics like a boss!
3. Audio Compression Ratios
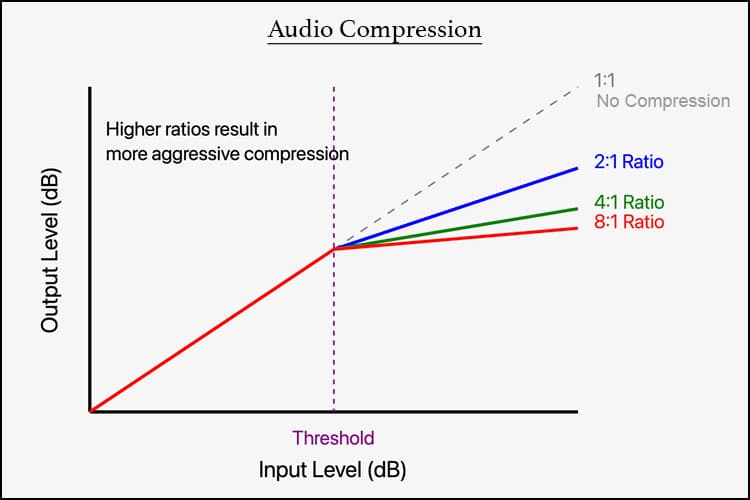
Alright, let’s talk about compression ratios. This is where things can get a bit mathematical, but don’t worry – I’ll keep it simple.
Think of ratios like spice levels in cooking. Mild compression is like adding a dash of salt, while heavy compression is like dumping a whole bottle of hot sauce on your food.
Let’s break it down:
- Mild compression: Typically ratios from 2:1 to 4:1
- Moderate compression: Around 4:1 to 8:1
- Heavy compression: 8:1 and above
Now, when I first started out, I thought bigger ratios were always better. Boy, was I wrong!
I once slapped a 20:1 ratio on a gentle acoustic guitar part. It sounded like I’d run over the guitar with a steamroller. Not exactly the warm, intimate sound we were going for!
So, when should you use different ratio settings? Well, it depends on what you’re trying to achieve.
For subtle, transparent compression, stick to lower ratios. I often use 2:1 or 3:1 on things like acoustic guitars or vocals when I just want to even things out a bit.
For more noticeable compression, maybe on a bass guitar or to tame some aggressive drums, you might go for 4:1 or 6:1.
And when you really want to squash something, like for a pumping EDM side chain effect, that’s when you break out the big guns with 10:1 or higher.
But here’s the thing – these aren’t hard and fast rules. I’ve used gentle 2:1 compression on drums and heavy 10:1 on vocals.
It all depends on the source material and what you’re trying to achieve.
One mistake I see a lot of beginners make (and trust me, I did this too) is over-compressing.
It’s easy to get carried away and crank up that ratio, thinking “more is better”.
But too much compression can suck the life out of your tracks faster than a vampire at a blood bank.
Remember, the goal of compression isn’t always to make everything as loud as possible.
Sometimes, it’s about controlling dynamics or adding character to a sound.
I once worked on a rock track where we deliberately over-compressed the snare drum with a high ratio.
It sounded absolutely crushed on its own, but in the context of the mix? It was exactly the aggressive, in-your-face sound we needed.
Pro Tip: Try using multiple compressors in series with gentler ratios, rather than one audio compressor doing all the heavy lifting.
It’s like lifting a heavy box – it’s easier if two people each lift a little, rather than one person trying to lift the whole thing.
For example, instead of using one audio compressor with an 8:1 ratio, try two compressors, each set to about 2.5:1. The end result is similar, but it often sounds more natural and musical.
And don’t forget about makeup gain!
As you increase your ratio, you’ll need to add more makeup gain to bring the level back up.
It’s easy to be fooled into thinking “more compression sounds better” when really, you’re just making it louder.
Always level-match when comparing different ratio settings.
Lastly, trust your ears. The numbers are just a starting point.
I’ve had times where a 2:1 ratio sounded more aggressive than a 6:1 on a different compressor.
Every audio compressor (hardware or software) has its own character, so don’t get too hung up on the numbers.
Remember, compression is a tool, not a rule.
Use it to serve the music, not to show off your technical skills.
And most importantly, have fun with it! Experimenting with different ratios can lead to some really cool, creative sounds.
So there you have it – the art of compression ratios. Now go forth and compress, my friends!
But please, for the love of all that is holy, don’t crush your mix into oblivion. Unless that’s what you’re going for, in which case… rock on!
4. Audio Compressor Attack and Release Times

Alright, folks, let’s dive into the world of attack and release times.
These little devils can make or break your audio compression game.
Get ’em right, and your tracks will sing. Get ’em wrong, and well… let’s just say things can get messy.
First off, let’s break it down:
- Attack time: How quickly the audio compressor reacts to a signal above the threshold
- Release time: How long it takes for the audio compressor to let go once the signal falls below the threshold
Now, I used to think faster was always better. Boy, was I wrong!
I once set a super-fast attack on a snare drum, thinking it would tighten things up.
Instead, it sounded like someone had replaced our snare with a wet noodle. Not exactly the punchy sound we were after!
Here’s the deal: quick attack times are great for taming transients.
They can help control spiky signals and even out your sound.
But be careful – too fast an attack can rob your audio of its natural punch and impact.
On the flip side, slower attack times let those initial transients through before the compression kicks in.
This can be great for preserving the natural attack of drums or adding punch to a bass guitar.
I remember working on this funk track once. The bassist was killer, but the recording was all over the place dynamically.
I used an audio compressor with a slow attack to let that initial finger noise and pluck come through, then clamped down on the sustain.
Suddenly, the bass was sitting perfectly in the mix, with all the funk intact!
Now, release times are where things get really interesting.
Short release times can add energy and excitement to your tracks.
They’re great for things like drum room mics or adding some pump to a mix.
But watch out – if your release is too fast, you can end up with distortion or a “pumping” effect. Unless that’s what you’re going for, of course.
I once accidentally created this weird, pulsing effect on a piano track with a super-fast release time.
The artist loved it so much we ended up keeping it in the mix!
Longer release times, on the other hand, can smooth things out and add sustain. They’re often great for vocals or bass, where you want a more consistent sound.
Here’s a trick I love: try timing your release to the tempo of the track.
For example, if you’re working with a 120 BPM song, a release time of 250ms lines up perfectly with a quarter note.
This can create a subtle, rhythmic pumping that can really groove with the track.
One mistake I see a lot of beginners make (and trust me, I did this too) is setting and forgetting their attack and release times.
But different parts of your song might need different settings! Don’t be afraid to automate these parameters.
I often use faster attack and release times in choruses to add excitement, then back off in the verses for a more natural sound.
Remember, there’s no one-size-fits-all setting. It all depends on your source material and what you’re trying to achieve.
I once spent an entire afternoon just tweaking the attack and release on a particularly troublesome vocal track.
Was it a bit obsessive? Maybe. But the end result was so worth it.
5. Parallel Compression: The Secret Sauce
Alright, buckle up, because we’re about to dive into one of my favorite compression techniques – parallel compression.
This bad boy is like the secret sauce of the audio world, and let me tell you, it’s finger-lickin’ good!
So, what’s parallel compression? Well, imagine you could have your cake and eat it too. That’s basically what parallel compression does.
You get to keep all the juicy transients and dynamics of your original signal while still getting that compressed, in-your-face sound. It’s like magic, I tell ya!
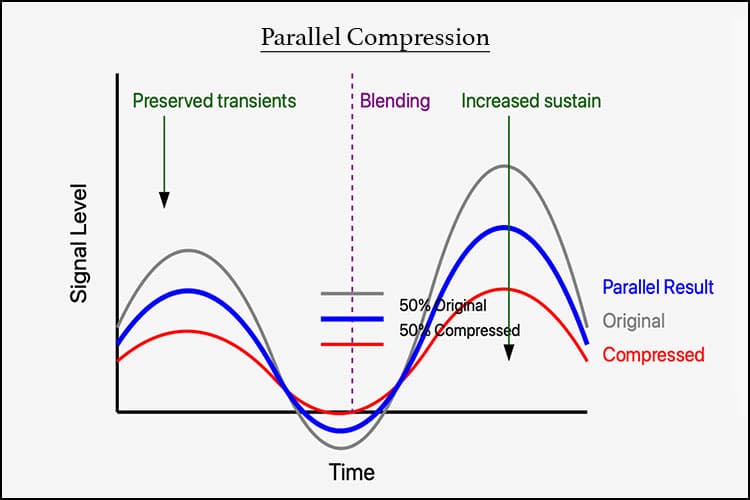
Here’s how it works: instead of compressing your entire signal, you blend a heavily compressed version with the original, uncompressed signal.
This graph above visually demonstrates how parallel compression works:
- The original signal (gray) has a wide dynamic range with prominent peaks and quieter sections.
- The heavily compressed signal (red) has a much narrower dynamic range. The peaks are reduced and the quieter parts are brought up.
- The parallel compression result (blue) blends these two signals. In this example, it’s a 50/50 mix, but the blend can be adjusted to taste.
- The result maintains much of the transient detail from the original signal (notice how the blue line follows the gray line’s peaks) while also benefiting from the sustain and consistency of the compressed signal (blue line doesn’t dip as low as the gray in quieter sections).
It’s like having your responsible friend and your wild party animal friend at the same event – you get the best of both worlds!
I remember the first time I really understood the music production basics and nailed parallel compression on a drum bus.
It was like the clouds parted and the audio gods smiled down on me.
The drums had this incredible punch and energy, but they still breathed and felt alive. It was a game-changer!
Pro Tip: Don’t just slap parallel compression on everything and call it a day.
It’s a powerful tool, but like any power tool, you gotta know when and how to use it.
I once got a little too excited and parallel compressed every single track in a mix.
Let’s just say it sounded like everything was trying to punch you in the face at the same time. Not exactly easy on the ears!
One of my favorite ways to use parallel compression is on vocals.
You can really bring a vocal forward in a mix without losing its natural dynamics.
I like to set up a send to an audio compressor with some pretty aggressive settings – we’re talking high ratio, low threshold, fast attack and release.
Then I blend it in juuuust enough to give the vocal some extra presence and consistency.
But here’s the kicker – don’t forget to high-pass filter your parallel compression channel!
Otherwise, you can end up with this weird, bloated low-end that’ll make your mix engineers cry.
Trust me, I learned that one the hard way.
And hey, don’t be afraid to get creative with it!
I once used parallel compression on a synth pad, but instead of blending it subtly, I cranked it up and added some distortion.
Suddenly, this soft, pillowy pad had this gritty, aggressive layer underneath. It was like the pad hit the gym and came back all buff!
Remember, parallel compression is all about control.
You get to decide exactly how much of that compressed goodness you want in your mix.
It’s like being the DJ of dynamics – you’re in charge of the party, baby!
So there you have it, folks – the magic of parallel compression.
It’s a technique that can take your mixes from “meh” to “magnificent”.
Just remember: with great power comes great responsibility. Use it wisely, and your tracks will thank you!
Audio Compressor Wrap Up
There you have it – 5 essential audio compressor tips to elevate your music production game!
Remember, compression is as much an art as it is a science. Don’t be afraid to experiment and trust your ears.
With practice and these tips in your toolkit, you’ll be crafting professional-sounding mixes in no time.
So go ahead, fire up your DAW, and start compressing like a pro!
Your tracks (and your listeners) will thank you.


