Are you ready to turn your musical dreams into reality? Welcome to the world of home demo recording!
In 2024, creating professional-sounding demos from the comfort of your own space has never been more accessible.
That’s right – your next hit could be born right in your bedroom!
Lets walk through 10 essential home demo recording tips that’ll help you capture your creativity and impress industry pros.
1. Set Up Your Home Recording Space

Let me tell ya, setting up a home recording space ain’t no walk in the park!
When I first started, I thought I could just plop down anywhere with my mic and start belting out tunes. Boy, was I wrong!
First things first, you gotta find a quiet room. And I mean quiet.
I once tried recording in my living room, only to have every car that drove by ruin my takes. Trust me, you don’t want to be dealing with that kinda frustration.
So, I eventually settled on converting my spare bedroom into a mini studio. It’s away from the street and has thick walls, which is perfect for keeping out unwanted noise.
According to SonarWorks, more artists have been creating successful music using minimal equipment in a room right in their own home.
But here’s the kicker – even a quiet room can sound like crap if you don’t treat it right.
I learned this the hard way when my first recordings sounded like I was singing in a tin can. That’s when I discovered the magic of acoustic treatments.
Now, you don’t need to go broke buying fancy foam panels. I started with some DIY studio soundproofing and strategically placed furniture. It’s not perfect, but it made a world of difference.
Oh, and let’s talk about organization. I used to have cables everywhere, tripping over my interface, and knocking things over. It was a mess!
Now, I’ve got everything set up properly. My computer’s on a desk, interface within reach, and all my cables are neatly tucked away.
It’s made my workflow so much smoother. No more fumbling around looking for that one cable I need!
Here are some quick tips I’ve picked up along the way:
- Use a closet as a vocal booth if you’re really tight on space
- Hang heavy curtains over windows to reduce outside noise
- Place your desk away from walls to minimize early reflections
Remember, your recording space doesn’t have to be perfect right off the bat. It’s all about experimentation and finding what works for you.
Heck, some of the best recordings I’ve made were in less-than-ideal conditions. It’s all about making the most of what you’ve got!
2. Invest in Essential Recording Equipment

Alright, let’s talk gear. When I first started out, I thought I could get by with just my laptop’s built-in mic. Yikes! That was a disaster waiting to happen.
Trust me, investing in some decent music production equipment will save you a ton of headaches down the road.
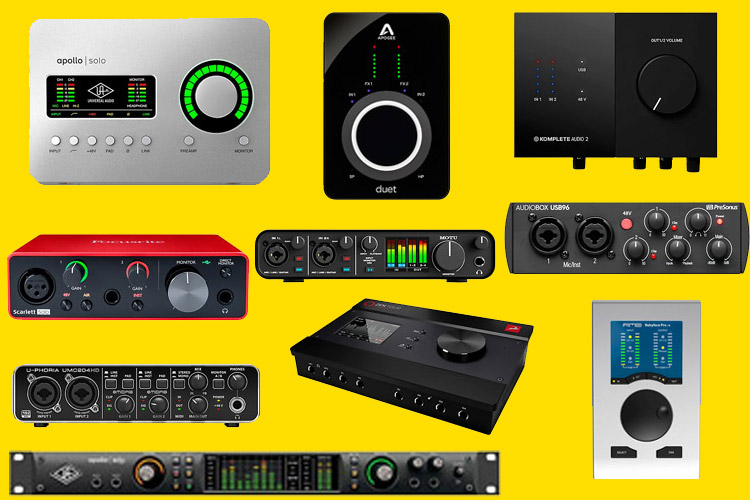
Audio Interface
First up, you’re gonna need an audio interface. This little box is what connects your mic to your computer.
I remember when I bought my first interface – I was so excited, I plugged it in before even reading the manual. Big mistake!
Took me hours to figure out why I wasn’t getting any sound. So, pro tip: always read the manual, folks!
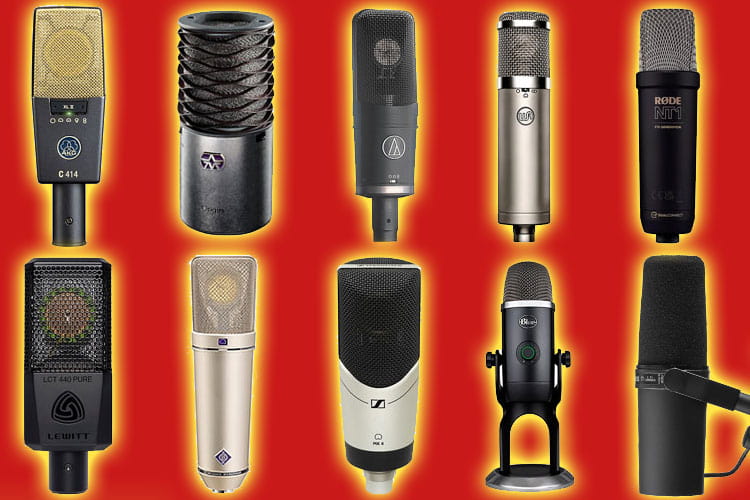
Microphones
Now, let’s chat about microphones. Oh boy, this is where things can get overwhelming real quick.
There are so many options out there, it’s enough to make your head spin!
I’ve tried everything from cheapo USB mics to fancy tube condensers.
Here’s what I’ve learned: you don’t need the best microphone for recording vocals to get great results.
What matters is finding one that suits your needs and learning how to use it properly.
For example, I once splurged on a high-end condenser mic, thinking it would magically make my vocals sound amazing.
Turns out, it picked up every little breath and mouth noise, making editing a nightmare.
I ended up going back to my trusty dynamic mic, which was much more forgiving for my less-than-perfect technique.
Headphones
And don’t forget about headphones! I used to mix on some cheap earbuds, wondering why my tracks sounded so different on other systems. I
nvesting in a good pair of studio headphones was a game-changer. They don’t have to be super expensive, but make sure they’re designed for monitoring, not just casual listening.
Here’s a quick rundown of what I consider essential gear:
- A reliable audio interface (doesn’t have to be fancy, just dependable)
- A versatile microphone (I’d recommend a good all-rounder to start)
- Studio-grade headphones for accurate monitoring
Remember, it’s not about having the most gear, but about knowing how to use what you’ve got.
I’ve heard some incredible recordings made with nothing more than a basic setup and a whole lot of creativity.
So don’t let gear lust hold you back – work with what you can afford and focus on honing your skills!
3. Master Your Digital Audio Workstation (DAW)

Okay, let’s dive into the world of DAWs. This is where the magic happens, folks!
Choosing the right DAW can be a bit like finding your soulmate – it takes time, patience, and a whole lot of trial and error.
When I first started figuring out how to produce music, I was totally overwhelmed by all the options. Pro Tools, Logic, Ableton, Reaper – it was like trying to decipher a foreign language!
I ended up downloading every free trial I could find and spent weeks hopping from one to another.
Not the most efficient approach, I’ll admit, but it did help me figure out what I liked and didn’t like.
Pro Tip: Don’t just go for the DAW that your favorite artist uses.
I made that mistake and ended up with a program that was way too complicated for my needs at the time.
Instead, think about what kind of music you want to make and what features are important to you.
Once you’ve chosen your DAW, it’s time to get familiar with it. And I mean really familiar.
I used to spend hours clicking around, trying to figure out how to do basic tasks.
Then I discovered the holy grail of productivity: keyboard shortcuts!
Learning these bad boys will save you so much time and frustration. Trust me, your future self will thank you.
Plugins and Effects
Now, let’s talk about plugins and effects. These are like the spices in your musical kitchen – use them wisely, and they can take your tracks from bland to grand.
But here’s the thing: don’t go overboard!
I once went through a phase where I was slapping every effect I could find onto my tracks.
The result? A muddy, overprocessed mess. Less is often more when it comes to effects.
Here are some tips for mastering your DAW:
- Start with the basics and gradually learn more advanced features
- Watch tutorial videos specific to your chosen DAW
- Join online forums or communities for tips and troubleshooting
Remember, becoming proficient with your DAW takes time. Don’t get discouraged if things don’t click right away.
Keep experimenting, keep learning, and before you know it, you’ll be navigating your DAW like a pro!
4. Optimize Your Computer for Recording

Let’s talk about getting your computer ready for some serious recording action.
Trust me, I’ve learned the hard way that a poorly optimized computer can turn your recording session into a nightmare real quick!
Programs
First things first, you gotta close those unnecessary programs.
I remember trying to record while having about a million Chrome tabs open, plus Spotify, and who knows what else.
My poor computer was wheezing like an old dog climbing stairs. Suddenly, in the middle of a perfect take, everything froze up. Talk about frustrating!
Now, I make sure to close everything I don’t need before I start recording. It’s like giving your computer a nice, deep breath before the marathon.
Audio Settings
Now, let’s chat about audio settings. This is where things can get a bit technical, but stick with me.
Latency is the enemy here, folks. That’s the delay between when you play or sing something and when you hear it through your headphones.
Too much latency, and it feels like you’re trying to perform while underwater. Not fun!
I spent way too long dealing with this before I figured out how to adjust my buffer size.
It’s a balancing act between low latency and avoiding those nasty audio glitches.
Oh, and here’s a tip I wish someone had told me earlier: use an external hard drive for your projects.
I used to keep everything on my computer’s main drive, and let me tell you, things got slow real fast.
Now, I’ve got a dedicated external SSD for all my recording projects. It’s like night and day in terms of performance.
Here are some quick tips for optimizing your computer:
- Regularly clean up your hard drive to free up space
- Update your drivers and operating system
- Consider upgrading your RAM if you’re working with large projects
Remember, a well-optimized computer is like a well-tuned instrument.
It might take some time and effort to get everything running smoothly, but it’s so worth it when you’re in the middle of a killer recording session and everything just works.
Trust me, your future self will thank you for putting in the effort now!
5. Nail Your Microphone Techniques

Alright, let’s dive into the world of microphone techniques. This is where the rubber meets the road, folks!
I can’t tell you how many times I’ve thought I nailed a take, only to listen back and hear all sorts of unwanted noises and wonky sound quality.
But don’t worry, I’ve made all the mistakes so you don’t have to!
Polar Patterns
First up, let’s talk about polar patterns. This is basically how the mic picks up sound from different directions.
When I first started, I thought all mics were the same. Boy, was I wrong!
I once tried to record a duet using a mic with a cardioid pattern, positioning us on opposite sides. Spoiler alert: it didn’t work.
One person sounded great, the other sounded like they were singing from the bottom of a well.
Lesson learned: understand your mic’s polar pattern and position accordingly.
Mic Placement
Now, onto mic placement. This is where the magic happens, but it can also be where things go horribly wrong.
I remember trying to record acoustic guitar and positioning the mic right in front of the sound hole.
The result? A boomy, muddy mess.
It took a lot of trial and error (and some helpful YouTube tutorials) to figure out that pointing the mic towards the 12th fret often gives a more balanced sound.
Pop Filters
Oh, and let’s not forget about those pesky plosives and vibrations.
Pop filters and shock mounts aren’t just fancy accessories – they’re lifesavers!
I learned this the hard way when I recorded a whole verse, only to realize later that every “p” and “b” sound made the mic clip.
And don’t even get me started on the time I recorded on a rickety table without a shock mount. Every time I shifted in my chair, it sounded like an earthquake!
Here are some quick tips for better mic technique:
- Experiment with distance from the mic for different sounds
- Use a pop filter for vocals to reduce plosives
- Try different angles to find the sweet spot for your instrument
Remember, great mic technique is all about experimentation. What works for one person or instrument might not work for another.
Don’t be afraid to try new things and trust your ears.
And hey, even if you make mistakes along the way, that’s all part of the learning process. Before you know it, you’ll be mic’ing like a pro!
6. Perfect Your Performances Before Recording

Alright, folks, let’s talk about nailing those performances before you hit that red record button.
Trust me, I’ve learned the hard way that trying to fix a sloppy performance in post-production is like trying to put toothpaste back in the tube – messy and ultimately futile!
Practice
First things first, practice, practice, practice! I can’t stress this enough.
There was a time when I thought I could just wing it in the studio. Big mistake.
I ended up wasting hours trying to piece together a decent take from a bunch of mediocre ones.
Now, I make sure I can play or sing my part in my sleep before I even think about recording.
Timing
Now, let’s talk about our friend, the metronome. I used to hate this little clicking beast with a passion. It felt so restrictive, you know?
But then I realized something – if I couldn’t play in time with a metronome, how could I expect to play in time with a band?
So I sucked it up and started practicing with one regularly. It was tough at first, but now it’s second nature.
And let me tell you, it’s made a world of difference in my recordings.
Pro Tip: Record multiple takes, even if you think you’ve nailed it on the first try.
I once spent an entire day recording what I thought was the perfect guitar solo, only to realize later that there was a subtle buzz in the background that I hadn’t noticed.
If I had recorded multiple takes, I could’ve just used another one. Lesson learned!
Here are some quick tips for perfecting your performances:
- Record yourself practicing and listen back critically
- Try performing your part in different ways to find what works best
- Take breaks to avoid fatigue and maintain focus
Remember, the goal is to capture the best possible performance.
Don’t rely on editing to fix mistakes – aim to get it right from the start.
It might take more time upfront, but trust me, it’ll save you a ton of headaches down the line.
And hey, even if you don’t get it perfect, that’s okay too. Sometimes those little imperfections are what give a recording its character and charm!
7. Implement Proper Gain Staging

Alright, let’s dive into the world of gain staging.
Now, I know this might sound about as exciting as watching paint dry, but trust me, getting this right can make or break your recordings.
I learned this the hard way when I first started out.
So, what exactly is gain staging? In simple terms, it’s about setting the right levels at each point in your signal chain.
I used to think that as long as my meters weren’t in the red, I was good to go. Boy, was I wrong!
I’d end up with recordings that were either too quiet and noisy, or distorted and unusable.
Input Levels
Let’s start with input levels. This is where it all begins, folks.
You want to set your levels high enough to get a good signal, but not so high that you’re clipping.
I remember recording a killer guitar part, only to listen back and realize it was distorted beyond repair.
Now, I always leave a bit of headroom – aim for peaks around -6dB to -12dB.
It might seem quiet, but trust me, it’s much easier to turn things up later than to fix a clipped signal.
Compression
Now, let’s talk about compression during recording. This is a tricky one.
On one hand, an audio compressor can even out your performance and add some nice color.
On the other hand, too much can suck the life out of your track.
I once went through a phase where I was compressing everything to death during recording.
The result? Flat, lifeless tracks that were a nightmare to mix.
Now, I use compression sparingly during recording, if at all.
It’s usually better to capture a dynamic performance and adjust later if needed.
Here are some quick tips for proper gain staging:
- Start with your gain knobs around 12 o’clock and adjust from there
- Use your ears, not just your eyes – meters can be deceiving
- Remember that digital distortion is irreversible, so err on the side of caution
The key thing to remember is that good gain staging sets you up for success in the mixing stage.
It’s all about giving yourself plenty of headroom to work with.
Trust me, your future self will thank you when you’re not fighting with clipped or noisy tracks during the mix!
8. Utilize Virtual Instruments and Samples

Let’s chat about virtual instruments and samples, shall we?
This is where things can get really fun – and overwhelming if you’re not careful!
When I first discovered the world of virtual instruments, it was like being a kid in a candy store.
Suddenly, I had access to every instrument under the sun, right at my fingertips!
Now, don’t get me wrong, having a ton of options is great. But it can also lead to some, uh, interesting choices.
I remember working on a folk song and deciding it needed a full orchestra, three different synths, and a didgeridoo. Spoiler alert: it didn’t.
Learning to use virtual instruments effectively is all about restraint and choosing the right tools for the job.
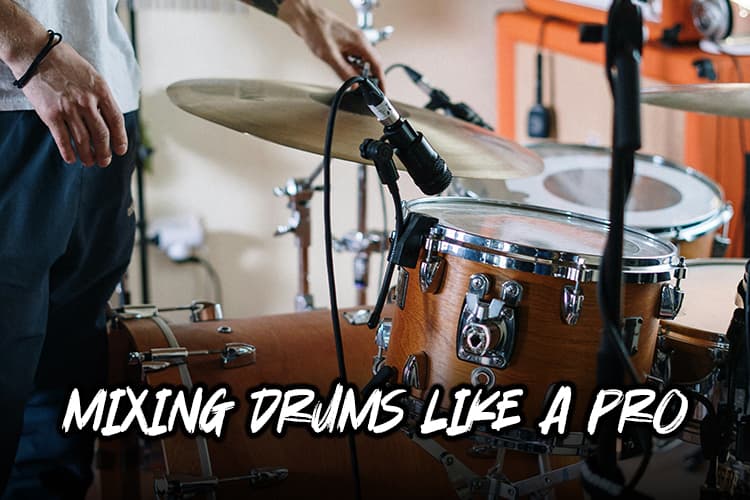
Drum Samples
Let’s talk about drum samples for a minute. These can be absolute lifesavers, especially if you’re working in a genre that needs tight, punchy drums.
I used to struggle with getting my live drum recordings to sound “professional” enough. Then I discovered the magic of drum samples.
Now, I often blend sampled drums with live recordings to get the best of both worlds – the feel of a real performance with the punch of well-recorded samples.
But here’s the thing about virtual instruments and samples – they can start to sound, well, virtual if you’re not careful.
I’ve found that the key is to treat them like real instruments.
That means playing them in real-time (instead of just programming), adding some subtle imperfections, and using effects to place them in a realistic space.
Here are some quick tips for using virtual instruments and samples:
- Invest in high-quality libraries, but don’t go overboard
- Learn to program realistic performances, not just perfect ones
- Use multiple articulations to add life to virtual string or wind instruments
Remember, virtual instruments and samples are tools, not crutches. They’re there to enhance your music, not replace your creativity.
Used wisely, they can take your productions to the next level. Just don’t forget to step away from the computer and play some real instruments too!
9. Apply Basic Mixing Techniques

Alright, let’s dive into the world of mixing. This is where the magic happens, folks!
But let me tell ya, when I first started out, my mixes were about as balanced as a one-legged elephant on a tightrope.
I’d crank up the vocals, then realize I couldn’t hear the guitar, so I’d boost that, and before I knew it, everything was just a loud, muddy mess.
EQ
First things first, let’s talk about EQ. This is your best friend when it comes to creating space in your mix.
I remember the first time I really understood EQ – it was like someone had given me a musical Tetris game.
Suddenly, I could make all these different elements fit together without stepping on each other’s toes.
Pro tip: Don’t just boost frequencies willy-nilly. Sometimes, cutting frequencies from one instrument can make space for another without touching its volume.
Panning
Now, let’s chat about panning. Oh boy, did I get this wrong when I started out.
I used to think “stereo” meant everything should be hard left or hard right. Let me tell you, listening back to those early mixes now gives me a headache!
Panning is all about creating a sense of space and width in your mix. Think of it like arranging musicians on a stage – you wouldn’t cram them all into one corner, would you?
Reverb and Delay
And let’s not forget about our good friends, reverb and delay. These effects can add depth and dimension to your mix, but use them sparingly!
I went through a phase where I thought more reverb meant more professional. Spoiler alert: it doesn’t.
It just makes everything sound like it was recorded in a cave. A very echoey cave.
Here are some quick mixing tips:
Use reference tracks to compare your mix Take regular breaks to rest your ears Try mixing at low volumes – it helps balance issues stand out
Remember, mixing is as much an art as it is a science. Don’t be afraid to experiment and trust your ears.
And hey, if you make some mixing mistakes along the way, join the club! We’ve all been there, and that’s how we learn and improve.
10. Master the Art of Bouncing and Exporting

Alright, we’ve made it to the final stretch – bouncing and exporting your tracks. This is where all your hard work comes together, folks!
But let me tell you, there’s more to it than just hitting that export button and calling it a day.
File Formats
First up, let’s talk file formats. When I first started out, I thought “bigger is better” and always exported in the highest quality possible.
Turns out, sending a 500MB WAV file of your latest banger to your bandmates isn’t always the best idea.
These days, I usually export a high-quality WAV for archiving and a decent quality MP3 for sharing.
Pro tip: Always keep your original project files and high-quality bounces. You never know when you might need to go back and make tweaks!
Levels
Now, let’s chat about levels. There was a time when I thought louder was always better.
I’d crank up the output until my meters were constantly in the red, thinking “This’ll sound great on everyone’s speakers!”
Spoiler alert: it didn’t. It just sounded distorted and fatiguing.
These days, I aim for a more reasonable level, usually peaking around -1dB to -0.5dB. It gives a little headroom for any further processing down the line.
Metadata
Oh, and don’t forget about metadata! This is something I used to completely ignore.
Then one day, I was scrolling through my music library and realized half my tracks were labeled “Audio_001” or something equally unhelpful.
Now, I always make sure to include the track name, artist, album, and any other relevant info. Future you will thank you for this, trust me!
Here are some quick exporting tips:
- Always do a final listen through headphones and speakers before exporting
- Consider making a few different bounces (full mix, instrumental, stems) for flexibility
- Double-check your export settings every time – it’s easy to forget to change them back after a quick MP3 export
Remember, the export process is your last chance to catch any issues before your track goes out into the world.
Take your time, pay attention to the details, and don’t be afraid to do multiple bounces if something doesn’t sound quite right.
Home Demo Recording Tips Wrapup
There you have it – 10 essential home demo recording tips to elevate your music in 2024!
Remember, creating great demos is a journey of continuous learning and experimentation.
Don’t be afraid to try new techniques, and most importantly, let your creativity shine through.
If you really want to level up your game check out some of the best online music production courses.
With these tips in your arsenal, you’re well on your way to producing professional-sounding demos that could open doors in the music industry.
So, what are you waiting for? Grab your instruments, fire up your DAW, and start recording your next masterpiece.
Who knows? Your home-recorded demo might just be the key to your big break!